On this webinar, we showed you how to use Jmix BPM to build event-driven processes.Event-Driven Approach to Development of Process Applications
How do you turn a BPMN diagram from a static model into a real, event-driven application?
That was the focus of our latest Jmix webinar, where we explored how to make process automation reflect actual business events – not just documentation.
During the session, we showed how to:
– apply the event-oriented approach to business process automation in practice;
– choose and use the right BPMN tools;
– organize interprocess interaction in Jmix BPM.
If you’re new to BPMN or want to apply the event-driven approach in your own project, [contact us](https://www.jmix.io/contacts/) — we’ll be happy to walk you through the essentials and help you get started.
We would like to demonstrate how to solve typical problems while creating an admin interface in Jmix and to show the benefits and the limitations of this approach.We often hear at conferences and other events how different development teams struggle with the problem of having to develop an admin interface quickly and efficiently. Some of them go for expensive custom solutions they develop all by themselves; others try looking for ready-made alternatives on the market that would fit all their business requirements. Certain hybrids of the two approaches are not unheard of. The problems they thus solve might look familiar to our team members, since we have had to deal with them too. We are lucky though to have a tool that offers a natural solution to the problem, a tool we have built ourselves. So, in this article, we would like to demonstrate how to solve typical problems while creating an admin interface in Jmix and to show the benefits and the limitations of this approach.
## Typical admin interface requirements
First of all, we must determine the requirements that the admin interface should cover.
– Data access in the database and the possibility to edit them. It is related to entity creation, DTO and CRUD screens. The entity number can be quite large, so the task of optimizing this process will be of a high priority. Apart from the data model and screen creation process optimization, you have to take into account the time spent writing migration scripts, mappers and other infrastructure elements, since these tasks are also resource intensive.
– Differentiation of access rights. Role model creation is critically important, since an admin interface gives access to sensitive data and to system functions.
– Audit. In this context, audit means tracking changes in the data model. It is necessary both for the support engineer work, to sort out a problematic situation, and for incident investigations and unauthorized action detection.
– Granting access to functions and data for external services. Usually it means implementing various REST endpoints for CRUD actions with data and for interaction with internal services. When the number of entities is significant, the routine creation of CRUD endpoints can take a lot of time.
## What is Jmix?
### Framework architecture
Jmix Framework is a full stack open-source framework for creating web applications, which is based on Spring Boot and Vaadin Flow. The main goal of the framework is to automate the routine actions for the developer, while preserving the development process flexibility and the easy access to the familiar tooling.
A Jmix application is a Spring Boot application with a set of Jmix starters. You can also include any other starters you are familiar with. To work with data, Jmix uses a unified data model based on the EclipseLink ORM framework.
The Vaadin Flow SSR web framework is responsible for working with the client side. It is based on the Web Components specification and the Google Polymer library suite. In Vaadin Flow, visual components consist of the client-side and the server-side parts. The client-side component code is written in JavaScript and TypeScript, white the server-side components are written in Java. They communicate with each other via AJAX requests. Therefore, Jmix Framework used the same language to write both the backend and the frontend parts of the application.
In order to work with Jmix Framework, a special Jmix Studio plugin suitable for IntelliJ IDEA, OpenIDE, and GigaIDE is used. Studio offers basic tools for working with the framework components, such as screens, roles, or entities.
Note that Jmix doesn’t position itself as a Low Code platform, since writing up the business logic is necessary for creating a fully-functional application, but certain Low Code elements are present in the form of various designers. In this case, a Less Code platform with auxiliary code generation components would be a more accurate definition.
## How Jmix solves the admin interface problems
### CRUD generation and visual designers
As we have already specified while discussing the requirements, the highest priority task of the admin interface creation process is the creation of a volumetric data model and the CRUD interfaces to work with it.
For this purpose, Jmix Studio offers various visual designers to work with the most basic application components. One of those is the entity designer. In an entity designer, you can specify connections between entities, define attributes and set constraints for them. Visual designers just modify what is represented in the application source code. This code can also be modified manually without involving the visual designer. The alterations written into the code will be reflected in the designer and vice versa.
The designer offers us an opportunity to familiarize ourselves with the available settings for the entity and its attributes. The elements responsible for entity index handling are also here.
When the data model is ready, we can start generating the CRUD screens. A special generator exists for this purpose, which can be called via a dialog window.
This dialog window is a screen creation wizard, in which you can select thet generation template and fill it in with the necessary parameters. You don’t have to use the template; it’s okay to create a custom layout from scratch. There is a blank template for this purpose, which only contains the screen’s skeleton.
The View & Edit screen generator analyzes the entity’s metamodel in order to create the necessary visual components for working with entities. Besides, for the View screen a table will be generated containing the selected columns corresponding to the entity attributes.
For example, the following model represents a component generation example based on the entity attribute type information:
Attribute
Type
Component to edit
username
String
TextField
password
String
PasswordField
email
String
EmailField
active
Boolean
Checkbox
The generated components will be bound with the data. If you edit a component via its bound attribute and then click the Save button, a commit to the database will take place.
The screens that have been created can be modernized, and their own business logic can be implemented inside them.
If you need not just the data from the SQL-based database, there is an option to create a DTO for the entity and then work with it in the same way you work with the JPA entities themselves. However, it will be necessary to configure a service, which is going to receive this data from an external source. If you don’t feel like configuring something, you can put the OpenAPI’s generator schema into Studio to generate the data model and the client.
Talking about generators, AI assistants are used more and more often, for example, for UI, REST interface, or entity structure generation. It saves a lot of time, but such an approach to generation might not take into account the project specifics or business context. You have to be careful and work according to the “trust but check” principle. If you don’t thoroughly proofread your generated code, you can get serious problems with its maintenance.
This is why Jmix emphasizes generators. But if the task still remains a routine one, while outside of the generators’ scope, you can use the built-in AI Assistant panel in Jmix Studio. Pre-trained for specifics, the Jmix model understands the context and is capable of generating more complex code. But the same rule about checking the resulting code still applies, since any AI model can hallucinate.
### Role model
Jmix has a built-in control system for access, based on Spring Security. A role is the central component of this system. There are two types of roles in the framework: resource roles and row-level roles.
– Resource roles are used to grant the user access to a resource. It can be an entity, a service API, or screens. By default, a new user has no access to anything.
– Row-level roles are used to forbid a user access to those table rows, for which he or she already has resource-level access. It can be useful for such cases as, for example, a manager who should have access to viewing employees from the same department only.
Thanks to the full stack architecture, we can set it up so that the role model will cover every layer of the application, from the data model to the user interface.
This way, a role, once created, will control all access to the system’s functions. For example, while loading entities from the API to let them interact with the database, filtered results will be removed or an access error thrown. If a visual component is related to some data, the limitations associated with the current role will be applied to this visual component, as well. If the user has only viewing rights, the input field will be seen as read-only. If the user has no rights even to view this information, the visual component won’t be displayed on the screen at all.
There are two ways of creating a role: a programmatic and a manual one. When the role is created programmatically, the developer creates a special Java interface that describes access rights for the role. Jmix Studio contains special designers that receive information about the application’s architecture and make it possible to choose the necessary rights for various parts of the application via the interface.
@EntityAttributePolicy(entityClass = Step.class,
attributes = “*”,
action = EntityAttributePolicyAction.VIEW)
@EntityPolicy(entityClass = Step.class,
actions = EntityPolicyAction.READ)
void step();
}
“`
Apart from this, if the system works on the production server, the administrator can create the necessary role and assign a user to it without contacting the developer. Such roles will be stored in the database and have the same priority as the roles created at the development stage.
### Audit
To close the audit tasks, the framework has a special Audit add-on. This add-on, like many others, is accessible through the add-on marketplace in Jmix Studio.
When you install the add-on into the application, a special Spring Boot starter is added. Add-ons can have purely service functionality, or they can contain additional interface elements, including new components and system screens.
Audit add-on brings with it screens for audit rule creation. For example, all attributes of the User entity get audited.
The screen next to it contains audit records, which can be used for change tracking.
We have decided to place this information directly into the UI, so that the system users could be granted access to it, and not just the programmers.
### Working with the UI
The main element of the user interface in Jmix are the screens. The screens are UI components from Vaadin Flow. They have two main elements: the Java controller and the XML layout.
The XML layout is optional and is used for the component declarative description and their placement on the screen. The Java controller is the main screen element that describes the business logic connected with the UI. That is where you process the data, change component states throughout the screen lifecycle, or create event handlers for various events.
Using XML layout, you can compose the screen template, add all the necessary visual components and connect them with the data. For each component, there is an inspector that shows the properties that can be modified, and the list of hooks, which can be implemented.
To avoid having to restart the application each time you change something in the UI, the hot-deploy feature exists. With its help, you can modify the screen, its business logic and just save the file. The saving action will trigger the loading of all modifications into the running application.
### Automated data migration
While updating the data model, the problem of synchronizing the changes with the database always arises. Jmix Studio has a migration mechanism for this, which is based on Liquibase. Each time the model is modified, a changelog is generated and applied to the database. Each add-on that carries with it a set of system entities, also has its own pre-prepared set of changelogs.
Besides, if the development is done “from the database”, a built-in reverse engineering system exists, which can generate the data model from the database tables.
## Comparison with other options and limitations
The first notable difference is the presence of ready-made architecture. Jmix uses project templates. From the moment you start the IDE to the moment you run the project only a few minutes pass. In the case when you have to create several similar admin panels it can save you a lot of time. Naturally, this approach has its drawbacks. If a standard application template doesn’t match your needs, you will have to create your own template, and that means more time spent.
When you are using native technologies, there is no such problem, since the project is flexibly configured. However, such a configuration can require a few days of work.
The second difference is the fact that the framework offers a higher level of abstraction. Existing APIs that provide database interactions, declarative configuring os UI components and visual configuration for the security model lower the entry threshold for developers for using the necessary technologies. These approaches do not forbid manual configuring and fine-tuning for the necessary systems. Moreover, if something in the framework works differently from the programmer’s wishes, there is always a possibility to override the necessary behavior. We, as the framework creators, always do our best to leave extension points and override points for the majority of systems and modules, which makes it easier to change the framework behavior to match your needs.
Moving forward to the comparison with technologies the framework is based on, a logical question arises: why not use these technologies as they are and what is the framework for? The main points are described in the table below.
Characteristic
Spring Boot + Vaadin Flow
Jmix
Architecture
Flexible
Monolith with multi-modularity support
UI
Ready component palette, manual layout work and manual data binding
Ready component palette + data binding + module stubs.
Security system
Self-developed, flexible
Ready out of the box, end-to-end within the project
Data sources
Any, manual setup
Any SQL-based + model generation and OpenAPI client generation
Development speed
Average, typical tasks solved manually
Very high at the start, high later
Support costs
High, depend on architecture solutions
Low
Solution flexibility
Very high, you can do everything… or almost everything:)
Average, customization possible within the Jmix and Vaadin architecture
If you use Jmix, you can get a large amount of ready-made functionality. However, as a trade-off, you have to accept the rules and restrictions pertaining to its architecture.
We all know that Server-side UI requires additional resources from the server. It happens because when we create a session at the server side, a full-scale UI instance is also created. In case of Jmix, we need to allocate approximately 10 Mb of memory per session. Besides, this approach imposes limitations on the interface customization capabilities, unlike when working with React + AntDesign.
Not all the familiar Java technologies are supported by the framework. For example, if you have to use non-relational databases, you will have to describe the DataStore on your own. Besides, using the not-so-mainstream EclipseLink framework under the hood can scare someone away.
What’s more, Jmix definitely won’t be the best option, of you use the microservice architecture. The reason for it is that because of the server-side UI approach user sessions consume a lot of memory. Consequently, it is very difficult to serialize the entire session. Therefore, the only option for load balancing is to use sticky sessions.
## Summary
On the whole, if you use only the functionality described above, you can create a good admin panel. Many of the problems well known to every developer are solved at the framework level. The framework contains a ready-made UI for CRUD development: forms, tables, and filters. A suite of add-ons solves typical problems such as audit setup, full-text search integration, or live notification system.
However, you shouldn’t think that the framework is a kind of silver bullet for solving your business tasks. It has a number of limitations, which should be taken into account while analyzing the applicability of the tool.
Source: How to Create an Admin Interface Quickly
The Kubernetes clustering software is becoming server applications management standard as, probably, the most feature rich and widely supported infrastructure toolchain.The Kubernetes clustering software is becoming server applications management standard as, probably, the most feature rich and widely supported infrastructure toolchain. However, it is still hard to set up from scratch. This can be fine when you run on cloud hosting with unlimited capacity but causes problems when you have to use your own software, or a custom configuration is needed. The good news is that such problems don’t usually appear at the application level, so you should be able to easily change your cluster software vendor when required without rewriting your applications from scratch.
To run our own K8s cluster, we will use MicroK8s as a quite lightweight and easy to use but powerful distribution. It is developed by Canonical (a Ubuntu Linux OS vendor) but still available for various Linux distributions as well as Windows and MacOS X operating systems using virtualization technologies. System-on-a-Chip devices like RaspberryPi and clones are also capable of running MicroK8s cluster nodes.
The set of extensions will allow you to manage your server software including LLM-model servers and agents.
In comparison to Minikube, another popular Kubernetes mini distribution, MicroK8s, enables clustering features and brings further helpful addons, making it a good choice for Small Office or Home infrastructures as well as for IT technology enthusiasts.
We are going to build a Jmix framework application and deploy it to a Kubernetes cluster configured by ourselves.
To start playing, we will need a virtual or dedicated server with at least 3-4 Gb RAM. You can rent a server with a hosting provider or even use your own PC or device.
When you obtain a server, you usually should have SSH access details for it that consist of an IP address, login and password information.
First, we will setup SSH-key authentication on it to login smoothly.
For Windows, you can use GitBash console or MSYS toolchain or PuTTY or setup WSL software to connect to your server.
## Set up your server connection
Generate your identity SSH-key if you haven’t done this before
“`
ssh-keygen -t ed25519
“`
Assume your server’s IP address is `45.87.104.148`
It is quite useful to have terminal sessions management software like Screen, Byobu or tmux that will keep your terminal session open after you have closed the terminal window.
To manage your microk8s you can use the `microk8s kubectl` command tool but it is also possible to install the original kubectl tool. This will be helpful in case your cluster is hosted on a separate server or a number of them. To do that run:
This will download the binary build for Linux and copy it into the `Path` folder.
Import context configuration from cluster to the current user’s kubectl profile
“`
microk8s config > $HOME/.kube/config
“`
If you plan to build the project on a local PC, copy this configuration relative to you local home folder.
After that you will be able to use the `kubectl` command instead of microk8s kubectl.
## Set up web panel
It can be quite useful to operate from a fancy looking web interface. You can enable it on a temporary basis, which seems more secure, by running the `dashboard-proxy` command:
“`
microk8s dashboard-proxy
“`
You will see the port number and the access token in the command output

Or on permanent basis by applying the following resource:
When the application will be deployed the key parameter vales will be provided by the cluster configuration. So you need to choose one from the following two options:
1. Setup application.properties configuration with variables
As the minimum requirement you will need to set up the datasource configuration as follows:
“`
main.datasource.url = jdbc:postgresql://${DB_HOST}:5432/${DB_NAME}?stringtype=unspecified main.datasource.username = ${DB_USER} main.datasource.password =${DB_PASSWORD}
“`
2. Enable profile-based configuration
Create the `application-dev.properties`, `application-prod.properties` files
Move the datasource configuration with hardcoded HSQL values to `application-dev.properties`
Create a “variable”-rich version of datasource confirugration in `application-prod.properties` as in p. 1
Replace `GITHUB_LOGIN` and `GITHUB_TOKEN` with your account’s real values in the above and the further examples.
Install Java on the computer where you are going to build your application from sources.
“`
sudo apt install openjdk-21-jdk
“`
To build an application container image, run the following Gradle command:
“`
./gradlew -Pvaadin.productionMode=true bootBuildImage –imageName=ghcr.io/GITHUB_LOGIN/sample-app –publishImage
“`
You should see successful status messages after a bit of time elapses during the building process:

## Delivery
To use GitHub’s Docker registry, you need to add a secret to the cluster
Create a `k8s/` folder in a location you are comfortable with. It can be the `project` folder, but professionals prefer to keep deployment configurations separated from sources.
Add the files listed below to the folder.
## Database Service Configuration
This file defines the PostgreSQL database service named `sample-db-service`.
The following file defines the application service named `sample-app-service`. It uses the `sample-registry/sample-app` Docker image with our application.
When we have all resource files in the folder, we can run them all with just one apply command:
“`
kubectl apply –f k8s/
“`
After that you can open the web panel and make sure that all status graphs are green; otherwise, you can check Logs from the Pos section.

The typical problem in this case is the order of services starting. You can try to restart or reapply the application container if it hasn’t found the database as it was not yet started.
To remove resources, use the same command but with the delete action
“`
kubectl delete –f k8s/
“`
Then fix your configurations and try again
## Check the results
To know the port number assigned to the application run the kubectl command with result filtering:
“`
kubectl get all –all-namespaces | grep service/sample-app-service
“`

In my case, the port number was 30377, so the URL to open in my browser http://45.87.104.148:30377

Check out the port that was mapped from 8080 and open it in browser.
Consider enabling ingress services and cert-manager or an external proxy server like nginx or Traefik for real-life application deployments.
## Enable clustering
Adding nodes to your cluster is quite easy, just execute
“`
microk8s add-node
“`
on the master node, and its output will contain the commands to run on another node, so it is joined to the cluster. This node must have MicroK8s installed, but Operating System distributions are not required to be the same.

After running it you can check the state with
“`
kubectl get nodes
“`
Command or in Cluster -> Nodes section of Web Panel
Now you can scale your application container to both running nodes.
And check the result in Pods or Deployment sections.
## Conclusion
As you can see, MicroK8S enables easy setup of Java/Jmix web application deployments for development, testing or SOHO purposes. This can be done in an extensible architecture way using your own hosted hardware resources or dedicated/virtual servers. The described approach keeps your software less vendor-locked, as you will be able to use the same source code, tools and resource configurations with other Kubernetes-compatible cluster software vendors and IT specialists.
Source: Deploy Jmix apps to Kubernetes
A helpful guide for those working with Camunda or Flowable who want to design processes the right way without surprises.Quite often one has to make API calls to various external services. In essence, it is a standard system orchestration scenario or even a microservice orchestration scenario (sorry for a buzzword). It looks simple and logical on a BPMN diagram – we knock at some door using an API, receive a response, and move on to the next task. For the analysis level models it is all quite normal.
BPM engines support two types of task running: synchronous and asynchronous. In my opinion, those names are rather unfortunate and unfitting, and only add to confusion.
In fact, it is all about the transaction boundaries and not the real asynchrony. In the context of BPMN, asynchronous running of the tasks is related to how the process stores its state and handles the step execution.
When you mark a task as asynchronous (e.g., with `asyncBefore` in Camunda, or `async` in Flowable), the process execution is explicitly split into separate transactions. At the async boundary, the engine persists the current state of the process in the database and creates a job in the job queue. The special component later picks up that job and continues execution in a **new transaction**. (In Camunda, `asyncAfter` slightly differs — it means the split happens after the task executes but before the next step.)
Therefore, asynchrony in BPMN is a way of handling transactions or task processing via a queue and not parallel execution of code or threads.
## Synchronous tasks
Service tasks are created as synchronous by default. There is certain logic in that: the engine works faster this way, since there is no need to store the process state in the database after every task. Everything is executed within the same transaction until we encounter a user task or another element that causes a waiting state. For simple tasks, which, for example, change the state of the process variable, carry out trivial calculations or write something into the log, this works fine. But in those cases when the result is not guaranteed and a failure is highly probable, synchronous running is exceedingly undesirable. Because it will cause a transaction rollback, the result of all previous tasks will be cancelled, and the process will throw an error. Do you really need any of it?
In general, if there is even a little potential risk that a certain task may fail to complete because of some external conditions, don’t leave it synchronous by default. The asynchronous option is not a silver bullet either, but we are going to discuss that below. It is better than nothing, anyway.
## Asynchronous tasks and Fail Retry
Now, let’s look at asynchronous tasks. As you have already realized asynchrony in BPMN doesn’t imply independent execution. The token won’t move forward until the task is completed. The only difference is this: now it is not the BPM engine that is responsible for the task execution, but a special component called the Job Executor. That is to say, all asynchronous tasks from all processes are lumped together in a common queue, and this very Job Executor executes them according to the queue order. If the task is completed successfully, the Job Executor informs the process about it, and the token moves forward.
Meaning that we have artificially created a new transaction boundary, and now the result of the previous tasks won’t be cancelled if something goes wrong:
Okay, and what is going to happen if our task is timed out or has thrown an exception? In BPMN terms it will be called a “technical error”, and if the `fail retry` parameter is set, the `Job Executor` will attempt to execute it again and again until the `fail retry` counter is down to zero. Once it happens, Camunda will create an incident, and Flowable will just mark this task as `failed`. Then the admin can try to correct the situation manually somehow.
It is a rather primitive solution, but it was invented twenty years ago, and in those days, it was considered the norm. Nobody hurried anywhere, the majority of processes involved some human actions, and human beings tend to slow the processes down. Therefore the recommended value for the `fail retry` parameter in Camunda and Flowable is still `R3/PT5M`, which means repeat three times in five minutes. For the completely automated processes adjusted for microservice orchestration, the five minute long pause between attempts looks like eternity. When we are in a fight for efficiency, it’s usually the matter of milliseconds, and now this…
And why can’t we set the `fail retry`, for example, to a hundred times in a hundred milliseconds? Well, it won’t work. This mechanism works like a `timer event`. That is, there is a special record in the database, and the already familiar `Job Executor` checks from time to time whether this timer is ready to click or not. From our practical experience, the minimum time for this is about 20 seconds, and less than that just doesn’t work. Of course, it depends on the hardware, but it is never fast enough.
But speed is not even the main consideration. Let’s look at it from the logical point of view. We have a service that doesn’t respond. And the system creates an instance of a process every second, and they keep trying to call the service in question. Or a hundred instances. Or a thousand. Before long you will find yourself overcrowded with processes knocking at the door of an unresponsive service. Fail retry cannot resolve such a situation by design. It can only exacerbate it.
Which means that the time has come to accept the fact that this mechanism is outdated. It shouldn’t be used for the solutions involved in completely automated processes with high intensity. So, what to do? You could look at the `Circuit Breaker` pattern, but that’s a completely different story for another article.
## Attached (boundary) events
BPMN contains another mechanism, which can be leveraged for our scenario with an unreliable external service. We are talking about attached (a.k.a boundary) events. They can help us implement the scenario, just as we used to do it with fail retry, but in a more flexible way. For example, you can go into a repeated attempt via timeout, just the same as before, or you can escalate the task to an employee for manual completion.
Suppose your process calls a certain service automatically, it is a counterparty checking service, and the API has been changed at the other side, so everything fails. Instead of creating incidents, the task can be delegated to a human being, who can simply phone your business partner. With error handling, the guiding principle is basically the same. If the service is returning some suspicious code, we can model any logic to react to it. It is a much more flexible approach than using fail retry, and a more visually comprehensible one, as well. The diagram becomes more complex, though. But life is a complex thing overall.
However, the service call in this implementation is still of the blocking type: the process is waiting for the task to complete. And an open transaction is left hanging.
– What will happen if the server fails while the transaction is still open?
Nothing entirely fatal is going to happen. The transaction will be rolled back, since the engine uses a two-phase commit, and this behaviour is normal. However, if the transaction was not persisted, the BPM engine system will discover an incomplete task in the `ACT_RU_JOB` table at the restart and will process it again. That is, the task will be executed a second time. And if it is not idempotent, this can cause duplication of data. This is true for both the synchronous and the asynchronous mode.
As you can see, long transactions in BPMN can create problems, even if they include only one task. Long transactions keep database-related resources and other system resources blocked, which can cause deadlocks and reduce the system’s performance. And let’s remember that there can be a lot of instances of that process. To summarize, long transactions are evil. So we would like not to leave the task hanging for an indefinite period of time, but to send a request to an external service, complete the task, move forward with the process, and then, later, receive the response.
## Event-based gateway
`Event-based gateway` is an element of BPMN used for making decisions based on events. Unlike other gateways, such as exclusive gateway, which make decisions based on data, event-based gateway waits for one of the several possible events and chooses a path inside a process depending on which event took place first.
It looks like something useful and particularly fitting our scenario – we send a request to an unreliable service, add this magical gateway and then receive all versions of the response. Such a diagram is very easy to read; it clearly demonstrates all the possible results of the task execution and allows us to model scenarios for each possible outcome. Furthermore, this approach makes it possible to create separate branches inside the process for various error types, which substantially increases verbosity and flexibility of the model.
It looks beautiful on paper! But it doesn’t work, if you make an API call from the usual `JavaDelegate` or `Spring Bean` by means of the good old `RestTemplate`. (Of course, `RestTemplate` is in itself a synchronous HTTP client that blocks the thread while the request is being completed. But this approach is easier and more familiar to many people than `WebClient`, so we are going to use it.)
We just need to allow the service task to complete itself, and the process will be able to move forward and switch to the waiting state with the event based gateway. But what to do?
Well, let’s send the HTTP request not from the service task itself, but from a different place. Let the service task initiate this action through an application event. Then everything will be fine: our service task will quickly shoot out an event, and its mission will be immediately accomplished. Then the event will be grabbed by a listener, but that will happen outside the process context. The listener, in its turn, will execute the HTTP request using `RestTemplate`, wait for the response and send one message or another into the process.
This is what it looks like on a time sequence diagram. We have uncoupled the BPMN process execution and the external service call. The process will go on along one path or another depending on the request result, OK or error.
The last little detail: our listener has to be asynchronous; otherwise, it will block the process by itself, and we will again have to wait until the external service condescends to respond. Fortunately, Spring has the `@Async` annotation; when we add it, the method is executed in a separate thread and blocks nothing.
## Implementing the process in Jmix BPM with the Flowable engine
Okay, let’s move from theory to practice and try to implement a non-blocking external service call from a business process. Supposing that we are receiving addresses from somewhere, and it is necessary to check whether they are real. This check will be done with the help of the Nominatim service: if the address exists, the service will return a location on the map; otherwise, it returns a `null`.
**Open-source geocoding with OpenStreetMap data**
> Nominatim (from the Latin “by name”) is a tool that searches for OSM data by name and address and also generates synthetic addresses for OSM locations (reverse geocoding). It also has a limited possibility of searching for objects by their type (pubs, hotels, churches, etc…) It has an API, which we are going to use.
In the middle of the diagram, you can see a service task named Send request to Nominatim. As we discussed above, the task itself doesn’t make the API call, it only sends an application event, which gets caught by our listener. It is not present on the BPMN diagram, but it carries out the most important work, the geocoding as such. After the service task we have the event based gateway set up to handle three options for the process continuation:
– Normal, when a positive response is received, and real coordinates have been found for the address.
– Error, when the address turned out to be faked, and the service has returned a null. In this case, the process throws a BPMN error with a certain code, which can be processed in the higher level process.
– Timeout exit. Naturally, an external service is not always available.
The external service doesn’t have to be down, it can be outside the accessible zone, and the application is not connected to the internet. But the process shouldn’t just hang. This situation must be processed correctly. Therefore, we model a `fail retry` and give it three attempts to receive a response. At every attempt the counter is incremented, and after three attempts we throw a BPMN error, but with a different code.
How it is different from the standard approach:
– The risks related to long transactions in the process are completely eliminated.
– All exceptional situations are visible and can be further improved. For example, after three attempts we can escalate the task to a human being instead of throwing an error. Or you can invent your own option for this.
## Implementation
The `Send request to Nominatim` service task calls the `AddressVerificator` bean:
“`
@Component(value = “ord_AddressVerificator”)
public class AddressVerificator {
private static final Logger log = LoggerFactory.getLogger(AddressVerificator.class);
log.error(“Order # {}: Address is NULL”, order.getNumber());
}
}
}
“`
In fact, the `verify` method from this bean only sends a `RequestSendEvent` message with the help of `ApplicationEventPublisher`, and it contains no other logic.
This message is caught by the `onRequestSendEvent` listener:
“`
@Async
@EventListener
public void onRequestSendEvent(RequestSendEvent event) {
}
“`
It is important for this listener to be asynchronous, because otherwise it will be executed in the same thread with the process, and the task will be completed only when it finishes working.
> The `@Async` annotation in Spring is used to execute methods in the asynchronous mode. It means that the method, which is annotated by it, will be executed in a separate thread without blocking the main thread where the program runs. This way, the main thread can continue to execute other tasks without waiting for the async method to be completed.
Then, we call the `verifyAddress` method from the `GeoCodingService` bean, and this method makes the actual call to the Nominatim service. The method returns a point on the map: the Point object. Depending on the result, we send a message to the process, which can be **”Address OK”** or **”Fake address”**. And then the `event based gateway` gets to work.
The geocoding service executes a typical HTTP request using `RestTemplate`:
“`
@Service
public class GeoCodingService {
private final RestTemplate restTemplate;
public GeoCodingService(RestTemplate restTemplate) {
}
“`
If the service hasn’t responded within a certain period of time, the timer goes off and the repeated attempt is carried out. To avoid getting an eternal loop, we use the attempt counter. In theory, after exhausting all the attempts we can escalate the task to an employee, who will make the check-up manually.
## Conclusion
When we design a business process, it is important to pay attention to the duration of system task executions and possible exceptional situations, which should be correctly processed. The `fail retry` mechanism should be treated with caution. It was invented a long time ago, and now we have more advanced patterns for such situations.
By combining the application events and BPMN events, we can uncouple the external service request execution and the task completion, in order to be able to use the `event based` gateway. This approach reduces the risks related to long transactions.
Source: A Non-Blocking Call of an External Service Inside a Process
A pragmatic approach to build billion-dollar apps with a small team.A pragmatic approach to build billion-dollar apps with a small team
## Introduction
How can you quickly fail with a Java project? Just pick every new technology from the latest conference without having a clear plan. But how can you build a big, reliable project quickly—even with a small team? The secret is choosing the right architecture and easy-to-use tools like **Jmix**, which helps you build enterprise applications faster and easier.
This article explains a useful software architecture called **Self-Contained Systems (SCS)**.
With SCS, you split your big application into smaller parts, called **domains**. Each domain is like a small, independent application. The key idea is to make these small applications talk to each other very little. This is akin to microservices, but simpler and easier to manage.
We learned about SCS by working on large, complicated projects. In this article, we share what we learned and show how SCS can help solve many real-life problems. We will also talk about how you can build billion-dollar projects using Jmix and how jmix makes it easier to build systems based on SCS quickly.
## The Evolution of Architectures
Software architecture has evolved through several phases, each addressing specific needs:
**1. Early Web Architectures (e.g., MVC)**
Initially, their focus was on delivering static content and simple request-response cycles. As projects grew in complexity, architectures like MVC helped scale codebases.
**2. N-Layer and SOA**
As systems became more interconnected, layered architectures and Service-Oriented Architecture (SOA) emerged to facilitate integration, data exchange, and code reuse. This approach improved internal communication, yet scalability still mainly boiled down to adding layers of code complexity rather than addressing team size or resource constraints.
**3. Microservices Era:**
Microservices changed the game by decomposing systems into more minor, independently deployable services. Different teams could own services and scale resources (CPU, memory, storage) for specific system parts. Microservices looked like a promising solution in terms of agility, continuous deployment, and architectural freedom. However, they also introduced substantial complexity, requiring intricate DevOps tooling, as well as extensive documentation and coordination.
**4. Disenchantment and Reassessment:**
Over time it became clear that the full scale-out capabilities and complexity of microservices was not for everyone. For many enterprise and e-commerce projects — especially those not operating at the “Big Tech” scale—the overhead brought forward by microservices became burdensome. Teams began looking for a middle ground solution, which preserved some modularity and fault tolerance without incurring the full complexity costs of microservices.
**Self-contained systems (SCS)** are small, independent applications which, taken together, form one bigger software product. Each SCS application focuses on one specific part (domain) of the whole system. They work separately and don’t depend much on each other.
You can think of SCS as something between microservices and a big monolith. Microservices are very small and can be hard to manage. A monolith is easy to build but hard to change. SCS gives you the best parts of both approaches—simple to manage, easy to change, and more stable. If one part fails, the other parts still work.
Here, you would typically see diagrams showing clear examples of monoliths, SOA, microservices, and SCS. These diagrams help you understand each architecture. Usually, SCS diagrams show multiple independent domain monolithic applications communicating through simple messages.
**The Philosophy of SCS**
The SCS community (notably Innoq) outlines several guiding principles:
1. **Domain-Centric Decomposition:** Break down the system by domain, with each domain as an autonomous subsystem.
2. **Domain Ownership:** Subsystems should not expose or import internal domain objects unnecessarily.
3. **Minimal Overhead:** Each subsystem resembles a microservice in architecture but can remain a monolith internally.
4. **Service Orientation:** Internally, a subsystem can contain multiple microservices, but externally it acts as a single unified system.
5. **Dedicated Databases:** Each subsystem manages its own data storage.
6. **Technological Freedom:** Teams choose the best technology stack without strict constraints from other subsystems.
7. **Asynchronous Communication**: Domains usually use REST APIs or simple asynchronous message brokers, depending on the situation (as an exception, they can also be synchronous).
8. **Communication Independence:** If one subsystem is down, others should continue operating or gracefully handle the unavailability. By the way, cross-system communications do not have to break any business processes just because of the unavailability of dependent subsystems.
9. **Team Alignment:** Each subsystem is owned by a single team (though one team can own multiple subsystems).
10. **Minimal Coupling:** Dependencies between subsystems should remain low. Using clear UI integration strategies can help reduce coupling further.
11. **Reusability:** Common functionality, UI components, or DTOs can be managed in shared libraries/toolkits.
12. **Separate UIs with Consistent Style:** Each subsystem has its own user interface. However, all UIs should follow the same style using a shared UI toolkit or clear style guidelines.
13. **Unified Look and Feel:** Users should feel like they are using one application despite the presence of multiple subsystems. All subsystems should look and behave similarly, using a shared UI kit.
14. **Seamless Integration:** From a user’s perspective, the subsystems present a unified experience (e.g., via hyperlinks, iframes, or a root layout).
15. **Bi-Directional Links:** Subsystems should allow cross-navigation via hyperlinks where it makes sense.
These principles are guidelines, not strict rules. Following them closely helps avoid future problems. Also, principles 1–11 might look similar to what we had with microservices. However, the last three (12–15) are SCS-specific. They ensure that each domain’s user interface looks good and feels easy to use, even though the domains are separate. They also help domains connect smoothly for the user.
## Advantages and Disadvantages of SCS
### Advantages
– **Fault Tolerance:** If one subsystem fails, the others can still continue working normally.
– **Independence for Teams:** Each subsystem can be developed and maintained separately.
– **Clear Domain Boundaries:** Encourages separating functionality clearly into independent modules or domains.
– **Keeps Monolithic Simplicity:** Allows fast development and easy changes, similar to building one big application.
– **Independent Deployments:** Subsystems can be updated, scaled, and released independently.
– **Good for Enterprise:** Usually simpler and cheaper than microservices, especially for large business applications.
### Disadvantages
– **Complex UI Integration:** Building multiple subsystems that look and feel like one application can be tricky.
– **Communication Effort:** Needs careful planning to connect subsystems, unlike a simple monolithic application.
– **Deployment Complexity:** Deploying SCS is simpler than microservices, but still more complex than a single monolith.
– **Extra Documentation:** You must clearly document how each subsystem works and interacts with others.
– **Shared UI Components:** All teams must use common UI tools or guidelines, which takes extra effort.
– **UI Performance Challenges:** Improving user interface speed and responsiveness is often harder across multiple subsystems compared to a single large application.
**Note**: For many business or e-commerce projects, these disadvantages are less important than having reliable and clear domain-specific features.
## Why Jmix is a Good Fit for SCS?
Self-Contained Systems (SCS) is a practical and proven architectural pattern for building modular software. But like any other architectural solution, its success depends on the right tools. In practice, we’ve found that Jmix aligns well with the core ideas of SCS, making it easier to implement in real-world scenarios.
Here’s exactly how Jmix supports SCS projects:
– **Rapid Domain Development:** Quickly builds separate, independent domains with ready-to-use tools and built-in patterns.
– **Built-in Security and User Management:** Jmix handles authentication, permissions and roles out-of-the-box, significantly reducing development complexity.
– **Simplified Domain Integration:** Jmix’s built-in REST APIs simplify the process of connecting multiple domains smoothly.
– **Consistent and Modern UI:** With the additional help of Vaadin,, Jmix provides easy-to-build, modern user interfaces without additional frontend overhead, allowing each domain to maintain UI consistency.
– **Robust Workflow Automation:** Built-in support for business process automation (using BPM tools like Flowable) allows domains to interact reliably and asynchronously.
– **Flexible Technology Base (Spring Boot):** Built upon Spring Boot, Jmix offers extensive flexibility and compatibility with existing Java and Kotlin ecosystems.
– **Scalable and Maintainable Monoliths:** Jmix helps build clear, maintainable Java or Kotlin monoliths without unnecessary complexity, aligning well with SCS principles of simplicity and low coupling.
Our focus on SCS comes directly from observing how naturally Jmix supports and simplifies this architectural approach. Combining SCS with Jmix results in easier, faster, and more reliable software development for enterprise-level projects.
For instance, consider a food delivery application. With Jmix, we rapidly set up distinct domains like orders, restaurants, and couriers. Each domain has its own database, UI, and business logic, while Jmix ensures straightforward integration between them. Complex tasks, such as assigning couriers or handling restaurant orders, become significantly simpler.
Later in this article, we’ll show you precisely how to build this food delivery application using Jmix and further explore the practical benefits of this combination.
Before diving into how Jmix fits into SCS, let’s first explore a straightforward case where the SCS approach clearly solves common architectural challenges. This will help show why SCS makes sense—even before we bring in any specific technology.
## An Ideal Scenario for SCS: AI Chat Platform
Imagine a platform where you can chat with an AI assistant, generate images, analyze documents, and even create code — all in one place. For example, think about something like OpenAI’s ChatGPT, but with extra features for images, files, and code. To the user, this looks like one big product. But inside, it is made up of several smaller, independent systems.
### Why Not Monolith or Microservices?
– If you build everything as one large monolith, it quickly becomes hard to manage and scale.
– If you go with full microservices, you might spend too much time and money on it.
**Self-Contained Systems (SCS)** offer a third way. Each big feature (chat, image generation, document analysis, code generation) becomes a standalone system — called a domain of subsystem. Each domain has its own UI, logic, and database. Still, from the user’s point of view, it all works as a single product.
Let’s break this platform into clear, independent domains:
– **Chat System:** Handles conversations with the user. It can use internal services like language models or embeddings, but always presents one simple interface.
– **Image Generation System:** Creates images from user’s prompts.
– **Document Analysis System:** Lets users upload and analyze documents.
– **Code Generation System:** Helps users by creating code based on their questions or prompts. It can use AI models or special algorithms to generate and explain code.
– **Integrations / Partner Services:** Connects to third-party services or external APIs.
Each subsystem:
– Has its own user interface (UI)
– Manages its own database
– Runs its own backend application
Sometimes, a subsystem may also include smaller internal services for extra processing or calculations. Subsystems can communicate through APIs or asynchronous messages. For example, if a user asks for image generation inside the Chat System, it sends a request to the Image Generation System and either receives a result or, if that system is unavailable, simply informs the user that the feature is not ready right now. This kind of seamless interaction between subsystems makes the whole platform feel like a single, unified product—even though it is built from separate parts.
This design lets every domain develop and improve independently, but together they create one smooth product for the user.
## Unifying the UX
Even though each domain can run on its own, users want the whole platform to feel like one product. SCS gives you several simple ways to create a unified and smooth experience for everyone.
Usually, there is a main application — sometimes called a “root layout”.
This part provides global navigation and **look and feel**. The main app can show other domains in iframes or by linking to them. All domains use the same UI kit to keep the style familiar for the user.
**Example layout:**
– **Top navigation** with links to Chat, Image Generation, Document Analysis, etc.
– **Main content area** displays the chosen subsystem’s UI (for example, via an iframe).
**Extra panels** can show history or context (like recent chats or images).
### Hyperlinks and Context Passing
Domains can link to each other using special URLs. For example, after generating an image, the Image System can give a link to the Chat System with the image’s ID. When the user clicks on it, the chat opens and shows the image inside the conversation. This way, domains stay separate, but users get a smooth workflow.
### Asynchronous Integration
Sometimes, domains send requests and wait for responses in the background.
For example, if the user asks for an image in the Chat System, the chat sends a request to the Image Generation System. When the image is ready, it sends a link back. If the image system is offline, the chat just tells the user “this feature is not available right now.” This keeps the experience smooth and reliable, even if some parts are down.
Let’s say a user currently interacts with the Chat (GPT) System and requests image generation. In a typical synchronous or hybrid approach the system world:
Check Availability: The GPT System pings the DALL·E (Image Generation) System to confirm that it is online.
1. **Delegate Request:** If available, the GPT System forwards the user’s prompt (e.g., “Generate a robot dancing on Mars”) to the DALL·E subsystem.
2. **Await Response:** The GPT System waits for the outcome (either synchronously or asynchronously).
3. **Provide Feedback:**
a. **Success:** Returns the generated image link or a small preview to the user.
b. **Failure:** If DALL·E is down, the GPT System immediately replies, “Image Generation is unavailable now.”
This setup ensures that each subsystem is autonomous. A DALL·E failure doesn’t break chat functionality — it only affects the image request.
### Autonomy, Resilience, and Flexibility
**Why this is useful:**
– Each domain can work, scale, and update by itself.
– If one domain fails, others keep running.
– New domains (like Audio Generation) can be added easily later—just plug them in.
**Minimal Inter-system Coupling:**
– Each domain hides its inner logic.
– Data is never shared directly — domains use stable APIs to talk.
– Teams can update or improve one domain without breaking others.
**User-Centric by DDD Approach:**
– Each domain matches a user’s real task (chat, images, docs).
– Each domain knows its job well, so it is easy to improve over time.
## Summary: Why SCS Works Here
In an SCS-based AI platform, each domain is like a “mini-app.” It manages its UI, business logic, and data independently. The root layout brings them together with iframes, links, and shared UI. The whole platform looks and works as one product but is easy to scale and maintain.
**What this gives?**
Fault tolerance — one domain fails, the rest keeps working.
– Scalability: scale only the most busy domains.
– Flexibility: add or change features with little effort.
– User focus: architecture matches how users see the product.
## The Quasi-SCS example
**Yet another food delivery demo**
Food delivery is a simple, real-world scenario everyone understands. It has independent subsystems (orders, restaurants, couriers), asynchronous flows, and easy roles — the perfect sandbox for demonstrating SCS. In fact, it’s even clearer than the AI chat example from earlier.
**Why Jmix?**
Jmix lets you build complex business logic, UI, and user roles fast. Out-of-the-box BPM (Flowable) handles business processes, and security is easy with Keycloak. We’re showing practical, step-by-step SCS architecture — not just theory, but real code.
### End-to-End Business Flow
Let’s see how a real food delivery process works before we jump into code.
**Domain Breakdown: Who Owns What?**
Let’s start by mapping out the key domains (subsystems) in the food delivery scenario:
– **Order System:**
Handles all user-facing interactions: selecting food, placing orders, tracking order status. Orchestrates the business process and acts as the “brain” of the flow.
– **Restaurant System:**
Manages restaurant data, menus, food items, and processes requests to prepare orders. Restaurant admins confirm the order preparation.
– **Courier System:**
Handles couriers, assigns delivery tasks, and updates order delivery status.
Note: In a full enterprise implementation, you’d likely have additional domains for payments, notifications, reviews, etc. For this demo, we keep it to three for clarity.
#### Step-by-step process
Here’s what happens with business process, step by step, from the user’s perspective:
1. User places an order:
– Views the restaurant list (from Restaurant System).
– Builds a cart, places an order.
2. Order System launches a business process:
– A new BPMN process instance tracks the order.
3. Restaurant confirmation:
– The process sends a request: “Can you cook this order?”
– Waits for the restaurant admin to accept.
4. Cooking confirmed:
– Restaurant admin confirms in their UI (also Restaurant System).
– Process resumes.
5. Courier assignment:
– Process requests a courier from Courier System.
– Waits for a courier to accept.
6. Delivery:
– Courier marks as delivered.
– Process ends, status is updated.
All long-running “waits” are handled asynchronously, thanks to Jmix BPM Engine.
#### Delivery business flow
Before we dive into the code, let’s look at a high-level diagram that illustrates the business process for food delivery. This will help you get a sense of the overall flow before we break it down step by step.
You might notice that I often use “monolith-style” diagrams to illustrate the delivery flow—even though our project is based on SCS principles. There’s a simple reason:
I built two versions of the application — one as a classic monolith and another using SCS. The monolithic version is much easier to visualize and explain, especially for readers who are new to these patterns. Our open-source example (see GitHub) uses the SCS approach, but is intentionally simplified — only three domains are implemented, and the BPMN isn’t 100% production-ready. For this article, I’ll focus on the simplified app, not a full-scale enterprise implementation.
If you really want to dive deep into a canonical SCS diagram for food delivery, feel free to check the full architecture in the repository.
But my advice is simple: Don’t stick too much to diagrams and business requirements.
Focus instead on the core ideas and follow the step-by-step walkthrough below.
By the way, BPMN diagrams make it much easier to understand how the process flows. So, if the system diagrams seem overwhelming, just skip ahead to the BPMN examples — they’ll clarify the process much more clearly.
Below BPMN diagrams make the process much clearer, so feel free to skip ahead to those examples if the system diagrams seem too complex.
– **Service tasks (Gear wheel):** Automated steps (like HTTP calls to Restaurant System).
– **User tasks (User icon):** Wait for admins or couriers.
– **Timers / errors (Clock):** Retry, timeout, or alternate flows.
We’ll see exact BPMN XML fragments in the next sections. Now, let’s look at how the Restaurant System is built in Jmix — with real code, REST endpoints, and UI screens.
## Building all together
Let’s start from the Restaurant domain. Why? The Restaurant System is a core domain in our food delivery SCS example. This is where restaurant admins manage menus, food items, and confirm cooking requests. Let’s see how we implement this subsystem in Jmix — step by step, with real code and business logic.
**1. Defining the Main Entities**
First, we define the main data structures.
For restaurants, we need entities like:
– Restaurant — the main entity for a restaurant.
– RestaurantMenu — a menu belonging to a restaurant.
– RestaurantMenuItem — individual dishes, belongs to the menu of the restaurant.
**Example Jmix entity for Restaurant:**
“`
@JmixEntity
@Table(name = “RESTAURANT”)
@Entity
public class Restaurant {
@JmixGeneratedValue
@Id
private UUID id;
private String name;
private String description;
// Optional: image/icon as attachment
}
“`
Other entities are similar, each with references back to Restaurant.
**2. Creating UI Screens with Jmix FlowUI**
With Jmix, you don’t need to write boilerplate UI code.
You can generate or customize CRUD screens for all entities:
– **Restaurant List Screen:** Shows all restaurants.
@GetMapping(“/restaurants”)
public List listRestaurants() {
return restaurantRepository.findAll().stream()
.map(restaurant -> {
var dto = new RestaurantDTO();
dto.setId(restaurant.getId());
dto.setName(restaurant.getName());
dto.setDescription(restaurant.getDescription());
// Set icon if available
return dto;
})
.toList();
}
@GetMapping(“/restaurants/{id}”)
public RestaurantDTO getRestaurant(@PathVariable UUID id) {
// fetch and map Restaurant to DTO
}
@GetMapping(“/restaurants/{restaurantId}/menus”)
public List listMenus(@PathVariable UUID restaurantId) {
// fetch and map menus for given restaurant
}
}
“`
**4. Confirming Cooking Requests**
Orders are passed from the Order System via a REST call, which the restaurant admin needs to confirm.
**Receiving a cook request:**
“`
@PostMapping(“/restaurants/{restaurantId}/cook”)
public String getRestaurantCookRequest(@PathVariable UUID restaurantId, @RequestBody OrderDTO orderDTO) {
// Save a new cook order for admin review
cookOrderService.submitNewCookOrderFromDTO(orderDTO);
return “Accepted”;
}
“`
Admins see pending cook requests in their Jmix UI and can accept them.
// Helper for creating cooking item list (not shown for brevity)
}
“`
What happens:
– This method receives an order, creates a CookOrderRequest entity, links it to the restaurant, and saves everything to the database.
– Jmix’s DataManager handles persistence and transactions, reducing boilerplate.
This is the kind of domain service you’ll find in each subsystem. It keeps REST controllers thin and business rules clear.
**5. How it fits into the BPMN process**
The Restaurant System is involved at these BPMN steps:
– Receives an automated service task (“request restaurant to cook”).
– Waits for a user task (admin confirmation).
– Sends callback to the Order System to resume the process.
(BPMN XML fragment — as promised!)
“`
“`
**Key Takeaways**
– **Clear domain boundary:** Restaurant System manages only its own data and UI.
– **Integration is explicit:** All cross-domain operations are via REST API, not direct DB calls.
– **Jmix FlowUI + REST = quick setup:** UI and APIs are generated or customized fast.
– **Human in the loop:** Restaurant admin interacts via UI, tying into the BPMN flow.
### How it fits into the BPMN Process
The BPMN engine (Flowable, integrated in Jmix) orchestrates the entire food delivery process as a long-running workflow. Each external interaction (like waiting for a restaurant admin to confirm cooking) is represented as a User Task in BPMN.
**How does the callback work?**
– When the admin in the Restaurant System confirms a cooking request, the system sends an HTTP callback to the Order System.
– The Order System finds the paused BPMN process instance for that order and moves it to the next stage.
**Example: Continuing the Order Process after Restaurant Confirmation**
“`@PostMapping(“/orders/{orderId}/restaurantstep/{restaurantId}”)
public void continueOrderRestaurantStep(@PathVariable String orderId, @PathVariable String restaurantId) {
orderProcessManager.continueProcessByRestaurantStep(orderId, restaurantId);
}
“`
**Service method to continue the process:**
“`
public void continueProcessByRestaurantStep(String orderId, String restaurantId) {
OrderEntity order = orderRepository.getById(UUID.fromString(orderId));
// Check if the callback is from the correct restaurant
if (!order.getRestaurantId().toString().equals(restaurantId)) {
throw new RuntimeException(“Illegal restaurant callback”);
}
// Find the waiting user task in the BPMN process and complete it
continueUserTaskInProcess(orderId, “WAIT_RESTAURANT_CALLBACK_TASK”);
}
“`
– The BPMN process resumed exactly at the point where it was waiting for confirmation.
– The workflow then moves on to the next automated or manual step (e.g., requesting a courier).
**BPMN XML snippet for this step:**
“`
Flow_0b7vho3 (randomly generated id’s of next task) Flow_1wegar9 (randomly generated id’s of outgoing task)
“`
This clear separation between service logic, UI, and the business process state makes your application resilient and easy to extend. If something goes wrong (restaurant doesn’t confirm in time, etc.), you can handle it in the BPMN diagram (e.g., add timeouts, errors or retries).
### Courier Assignment and Delivery
After the restaurant confirms the order, the process requests a courier and tracks the delivery. Everything is organized just like before: via dedicated REST requests and user/service tasks in BPMN.
**Requesting a Courier (Service Layer)**
When the BPMN process reaches the “Find Courier” step, a service task sends an HTTP request to the Courier System to publish a new delivery task:
“`
@Service
public class RequestCourierDeliveryStep extends AbstractTransactionalStep {
private final CourierClient courierClient;
private final OrderService orderService;
Once the courier delivers the order, they call another endpoint in the Order System:
“`@PostMapping(“/orders/{orderId}/delivered”)
public void continueOrderDeliveredStep(@PathVariable String orderId) {
orderProcessManager.continueProcessByDeliveredStep(orderId);
}
“`
“`public void continueProcessByDeliveredStep(String orderId) {
// Complete the user task and advance the BPMN process
continueUserTaskInProcess(orderId, “COURIER_DELIVERED_TASK”);
}
“`
– Each domain interacts through clear API boundaries and the BPMN-controlled process state.
– All “waiting” and “human” steps are managed in BPMN — which provides convenient support for timeouts, cancellation, escalation, or retries.
– No tight coupling or shared state between systems: each subsystem can go offline, be replaced, or scaled, and the process will just “pause” at the right place.
Note: For demo purposes, I put BPM Engine into the Order System, but for more stability, it is better to have Engine as a Standalone server (or as a System).
### Error Handling, Timeouts, and Final Delivery: BPMN and Jmix Patterns
In real business processes, things go wrong: a restaurant might not confirm, a courier might disappear, or a network glitch could interrupt the flow.
SCS and BPMN allow you to design for resilience—handling these failures explicitly, not sweeping them under the rug.
**Handling Errors and Timeouts (BPMN)**
BPMN lets you model timeouts and errors directly in the process definition, so your code stays simple, and the business logic stays visible.
**Example: Timer on Restaurant Confirmation**
Suppose, the restaurant admin doesn’t confirm the order in time. In the BPMN, we add a timer boundary event to the “Request Restaurant Confirmation” step:
“` Flow_1nr0tno PT1M
“`
If the timer fires (e.g., after 1 minute or in terms of BPMN – PT1M), the process moves to an “Order Cancelled” step, and the user gets notified:
“` Flow_1nr0tno Flow_0hj5ypr
“`
“` Flow_0hj5ypr
“`
Similar timers can be added for courier assignment and delivery.
**Clean Error Propagation**
Because the BPMN engine drives the process, your service code can stay focused: throw an error, and the process will handle it.
If any REST request fails (network error, HTTP 500, wrong input), you can catch it and throw a BPMN error. The process will move to the error handler, showing the user a clear message or triggering a retry.
**Example in Java:**
“`try {
// … REST call to Restaurant System
} catch (Exception ex) {
throw new BpmnError(“ORDER_CANCEL_ERROR”, “Could not confirm order with restaurant”);
}
“`
#### Final User Experience
If you need better understanding of what is happening in user flow, this [sub-article in the GitHub Repository](https://github.com/KartnDev/FoodDeliveryJmix/blob/main/docs/project-usecase/README.md) is for you.
– The user always sees a clear, up-to-date order status in the Order System UI.
– If something fails (timeout, cancellation), the UI shows an error message or “please try again.”
– All process transitions are visible to admins and users — nothing is hidden in backend logs.
### Summary: Why SCS + Jmix + BPMN?
– **Separation of Concerns:** Each subsystem is fully independent: failure in one of the subsystems does not cascade
– **Explicit Processes:** BPMN puts the real business flow front-and-center. Business users and developers can read and update it.
– **Rapid Iteration:** Jmix + Flowable BPM lets you add steps, UI, or logic without rewiring everything.
– **Enterprise-Ready:** Security (Keycloak), forms/UI, and process orchestration are all handled without tons of custom boilerplate.
### Conclusion for the Jmix Delivery Example
By walking through a real-world food delivery scenario with Jmix, you’ve learned:
– How SCS breaks up complex domains and business flows into truly autonomous systems.
– How Jmix helps rapidly build robust UIs, APIs, and back-office screens for each domain.
– How BPMN lets you orchestrate (It is unclear what the author is trying to say here), monitor, and evolve end-to-end processes that span domains.
– How clear API boundaries, process-driven integration, and explicit error handling make your project more resilient and maintainable.
**But here’s the twist:**
Our implementation isn’t a textbook SCS. We made a few pragmatic adjustments:
– **We skipped a root layout shell** — every domain has its own UI, and users simply access the needed subsystem directly (or put end-to-end bidirectional links like “Want to become courier? -> Courier system link”)
– Instead of **pure asynchronous** messaging between domains, we used **BPMN-driven orchestration** for all long-running or “waiting” steps. This actually gave us a more robust and transparent business process, easier to troubleshoot and extend.
Note: Sometimes, “bending the rules” makes the architecture even stronger for your team and use case.
If you want to explore or extend this demo, check out the full project on [GitHub](https://github.com/KartnDev/FoodDeliveryJmix/).
And remember: SCS isn’t about buzzwords — it’s about building resilient, understandable systems with the right tools for the job.
**What about the “root layout” dream?**
Of course, there are scenarios where you need a truly unified user experience across all subsystems — a seamless UI, deep cross-domain navigation, and the feeling that everything is “one big product.” The classic example? **Amazon’s ecosystem**.
Let’s wrap up with a quick look at how SCS can power even the most integrated, product-like platforms.
## Amazing “root layout” case: Amazon’s ecosystem
Amazon’s website is a textbook “root layout” example for Self-Contained Systems, even if it isn’t called that explicitly. To the user, it’s a single unified experience. Behind the scenes, it’s built from autonomous subsystems — each responsible for a major part of the business.
It might not publicly brand itself as employing Self-Contained Systems, but its vast range of services can be conceptualized similarly. Amazon’s platform appears as a single, unified website to the end-user. However, underneath the hood, you can imagine multiple autonomous subsystems:
– **Product Catalog and Search:** Provides product listings, filters, and recommendations.
– **Shopping Cart and Checkout:** Manages the cart, payment methods, discounts, and order confirmations.
– **Account Management and Settings:** Handles user profiles, order histories, and personal data.
– **Streaming Services (Prime Video, Music):** Each run as a self-contained subsystem with its own UI and logic, yet remains accessible from the main navigation.
From a user’s perspective, navigating from “Shop by Department” to “Prime Video” is seamless—even though these could be entirely different domains and tech stacks. In reality, these services communicate minimally (often via REST APIs or well-defined contracts), but the UI remains consistently branded for a cohesive look and feel. If a subsystem like Prime Video experiences issues, the rest of Amazon is still available—demonstrating fault tolerance and autonomy.
## Conclusion
**Self-Contained Systems (SCS)** offer a practical middle ground between classic monoliths and sprawling microservices. Whether you’re building a modern AI platform, a food delivery service, or a complex e-commerce site, SCS principles help you:
1. Divide your application into well-defined, domain-focused subsystems
2. Enable team autonomy, independent deployment, and robust fault isolation
3. Deliver a seamless, unified experience to your users
There’s no one-size-fits-all in software architecture. But with SCS, you gain flexibility—adopting the principles fully or partially, as your business and the tech context demand. The result: systems that are easier to change, more resilient to failure, and closer to how users and teams actually work.
Adopt SCS where it fits — and enjoy software that scales and evolves without unnecessary pain.
This webinar covered the new features and enhancements in the latest version of Jmix and our roadmap for future updates.Release Jmix 2.6 is here, and we are glad to share more details about key updates to this new version with you!
We recommend reading an [article](https://www.jmix.io/blog/jmix-2-6-is-released/) about the release and watching a webinar recording below to learn about all the features.
Speakers of the webinar:
Gleb Gorelov, Tech lead
Konstantin Krivopustov, Head of Engineering
Viktor Fadeev, Product Manager
What we discussed:
– AI Assistant in Studio
– Switch Component
– Masquerade 2.0 – new testing lib
– Tabbed Application Mode Improvements and new UI components
– Message Templates improvements
– Changes in Dynamic Attributes Views
We also covered the Subscription Plans Update and what it means for teams.
You can watch the recording of the workshop on our [YouTube-channel](https://www.youtube.com/live/BXILpeI7fok?si=pzq1UKjRO_VEd-kL).
In this article, we are going to talk about how to build a successful delivery strategy using Jmix.## Introduction
In this article, we are going to talk about how to build a successful delivery strategy using Jmix. Once you decide to start a new project with Jmix, you need to think about how you will deliver value to your customers in the most effective way. Failing this milestone at the very beginning can easily break the whole project when you start scaling and maintaining it. Let’s see how it may happen with the story of Ben.
## Ben’s Story
There is nothing unusual about Ben’s story — on the contrary, you might call it typical for our day and age, and many of our readers might find themselves in a similar situation one day. It’s a story of a seasoned software engineer who one day decided to create his product and found himself quite successful at first. He built a risk management app according to some local regulations, found a niche, a market for the product, and acquired his first 10 customers in just 9 months.
At this point Ben achieved positive cash flow, and all seemed well. But then he started to encounter issues that typically arise when users begin to adopt the product, and the number of customization requests increases drastically, each one being individual. You may recognize the situation, especially if you develop B2B applications. In this area, customization requests are very common.
As time goes on, Ben’s initial optimism gives way to frustration and burnout — an all-too-common reality in early-stage B2B development.
## What Went Wrong?
The answer is simple: at this stage, each minor logic fix has to be patched across 10 code forks, which leads to implementing 10 risky releases. What’s even worse, whenever Ben finds a bug in the core logic, he needs to fix it in every fork. It also becomes very hard to reuse features across the customer pool and to evolve the product itself. So, there is no room for growth, and all Ben’s time is now spent patching the forks rather than delivering new features to the product’s users.
Why do so many software engineers fall into this trap? Because by default, developers tend to start a new branch for every client. They arrange a dedicated database for each customer and then make changes in those branches, according to requests. As the infrastructure becomes more complex, they switch to fully manual deployment, which slows down progress and makes scaling much harder. We call this type of software development life cycle **“Copy, Paste and Pray”**.
It may seem trivial from the outside. But if you’ve experienced this situation firsthand, you know how stressful it can become. And this is exactly what we are going to explore below — how to avoid such pitfalls when starting your own digital product. This information is also useful for those who provide multi-client internal systems and are trying to balance customizations and maintainability.
To sum it up, Jmix is a perfect solution for Java/Kotlin teams who:
– Deliver multi-client, modular, or internal systems
– Work with limited or no frontend developers
– Need to balance customization with maintainability
These goals are achieved with the help of three delivery models that Jmix supports out of the box. Let’s discuss each of them in detail.
Ideal for
Solution
Benefits
Extension model
Dev shops
Core + Extension
Reuse
SaaS model
Product teams
Multitenant app
Scaling
Self-hosted model
Regulatory
Composite project
Control
## Core Extension Model
If you’re considering Jmix as the platform for your existing or next product, let’s begin with the [Core Extension Model](https://docs.jmix.io/jmix/modularity/index.html).
Jmix applications are built from subsystems—separate modules that encapsulate specific functionality. These can include domain logic, UI screens, roles, integrations, or reusable services. Subsystems are categorized as either core (provided by the Jmix platform, like security, data access, UI) or optional (added on demand, like Reports, BPM, or Multitenancy).
In Jmix terminology, subsystems are typically delivered as add-ons. An add-on is a self-contained functional unit that can be included in multiple projects. Developers can create custom add-ons to share business logic or integrations across teams or clients. The Core Extension Model builds on this modular structure.
You can implement this model in two ways:
1. **Reusable functionality as add-ons**: For example, you can create an add-on that retrieves national currency exchange rates. You can then integrate this into multiple projects. If the external API changes, you only update the add-on. All projects that depend on it get updated during the build process.
2. **Application core as an add-on**: You develop your core application as an add-on and deliver it to your clients. Each client can extend this core in their own application.
Let’s say you’ve built a niche CRM system – with shared entities, business logic, UI, and roles – and packaged it into a reusable core add-on. For Client A, you extend this CRM with a Deals module, new UI screens, and custom roles. For Client B, you add a new approval flow and industry-specific dashboards. Each client has their own Jmix project that depends on the same CRM core, but is extended in a modular and isolated way.
This setup allows you to:
– Deliver updates to the shared core and detect integration issues at compile time
– Keep client-specific logic separate and maintainable
– Delegate product customizations to partners or local teams using the same extension mechanisms
This approach is especially effective when you want to enable third-party developers or regional partners to adapt your product for local industries or compliance needs – without touching the core logic.
## SaaS Model
If your customers do not require many customizations and you aim to scale your application efficiently, consider the SaaS (Software as a Service) model. Jmix supports this model out of the box with a free [Multitenancy add-on](https://www.jmix.io/marketplace/multitenancy/).
In a multitenant model, all customers (tenants) access the same application instance. The Multitenancy add-on allows you to separate data, logic, roles, and permissions by tenant. You can:
– Use tenant-specific filters
– Create tenant-specific reports
– Define dynamic attributes per tenant
– Customize BPMN workflows per tenant
You can explore a demo of this setup via the [Jmix Bookstore application](https://demo.jmix.io/bookstore). For a real-world case, take a look at Certikeeper — a SaaS product built entirely with Jmix defaults and launched by a client team as their first product. Thanks to Jmix’s built-in multitenancy support, [Certikeeper](https://certikeeper.nl/) was delivered with minimal infrastructure and without excessive customization effort.
The SaaS model is ideal for SMB-targeted solutions with standardized workflows. But if you’re selling to banks, energy providers, or public institutions, the centralized infrastructure and limited customization options might not be acceptable.
## Self-Hosted & Composite Project Model
For clients in highly regulated industries — such as government, utilities, or banking — who demand full control, a **self-hosted** delivery model is often required. These customers may ask for complete source code access and expect the application to run in isolated environments, sometimes even offline.
In these scenarios, the product is delivered as a [composite project](https://docs.jmix.io/jmix/studio/composite-projects.html) — a Gradle-based setup where the main application includes multiple reusable or custom modules as local dependencies. This setup allows for:
– Building a dedicated client version from selected modules
– Customizing and extending features without duplicating the entire codebase
– Supporting long-term contracts with heavy integrations (e.g., ERP, CRM)
Jmix’s modular architecture allows teams to split functionality into bounded contexts — such as Inventory, Document Flow, or Delivery — and maintain them separately. You can keep a clean shared core and deliver only relevant modules per customer.
Composite builds are especially helpful when delivering code into a customer’s private Git repository. Customers can use Jmix Studio to assemble their own versions of the product, extend certain modules, and manage deployment themselves – all while still benefiting from updates to the core.
## Summary Matrix
Criteria
Extension model
SaaS model
Self-hosted model
Multi-client scaling
✅✅
✅✅✅
✅
Per-client customization
✅✅
✅
✅✅✅
Code reuse
✅✅
✅✅✅
✅
Design complexity
$
$$
$$$
DevOps complexity
$$
$$$
$
## Final Thoughts
The **Extension Model** offers a strong balance of maintainability and customization. It’s ideal when you don’t need massive scale but still need client-specific features.
The **SaaS Model** works best when your target audience doesn’t require heavy customization and shared infrastructure is acceptable.
The **Self-Hosted Model**, often combined with the composite project approach, fits regulated or high-control environments and enables modular customization while reducing code duplication.
If you’re not sure which model fits your case, [Jmix team](https://www.jmix.io/services-support/) can help with architecture design, deployment planning, or training to avoid common mistakes early in the process.
Everywhere you look, even the most serious enterprise solutions are expected to have at least some low-code elements.Low code gatecrashed the corporate landscape in the 2020s, growing faster than anyone expected. At first, we thought, “Well, it’s a cute little thing—let the users play at being programmers as long as they don’t get in the way.” Fast forward to today, and everywhere you look, even the most serious enterprise solutions are expected to have at least some low-code elements.
**But why?**
The hype really took off in 2021, when Gartner declared, “By 2024, 65% of all applications will be built using low-code technologies.” That stat spread like wildfire through every CIO chat group.
It’s easy to see what fuelled the buzz: COVID hit; everyone suddenly needed to work remotely; IT teams were stretched thin, and people were plugging holes with whatever tools they could find. Low code appears to get the job done—you just throw something together quickly, launch it, and the business is happy. Nobody was really thinking about how they’d have to support, upgrade, and maintain all this stuff down the road.
But here’s the thing: all the COVID-related fuss is long over, yet—according to Google Trends—interest in low code is still going strong.

*Source: Google Trends*
That’s odd, because it doesn’t really line up with what’s actually happening out there. The facts are that as follows: as of 2024, only 15% of enterprises are using low-code platforms for mission-critical applications—this is straight from Gartner themselves. Yet, in the same breath, they predict that by 2029, that number will skyrocket to 80%. Sure, we’ll believe it when we see it! (See source.)
## How I Fell for Low Code (and Fell Out of Love)
Don’t get me wrong—I have nothing against the idea of low code as such. In fact, there are plenty of cases where this approach really shines. Take batch scanning, for example: it’s a clear, well-defined tech process, which is practically made for low code automation. Remember Kofax? That was pretty much the perfect tool for batch document scanning. The workflow was hardwired: Preparation – Scan – Recognition – Validation – Verification – PDF Generation – Export.
Everything was set up visually, and if you needed more, you could write a bit of script, something like Visual Basic. I once sold this solution to IKEA to digitize their paper financial archives, set it up myself, and supported it for a few years. This was around 2006—back when nobody had even heard the term “low code.” But that’s exactly what it was. And what about all the classic low-code pitfalls people run into today? I saw them all in that little project.
It started with the business getting fed up with digging through piles of paper to find invoices or delivery notes from five years ago. As usual, IT had no resources for the project. So, we took the classic “guerrilla” approach to bringing low code into the organization—through a specific business need that IT couldn’t or wouldn’t help with. And, as often happens with low code, we got quick results—bam, it worked! And then we got a full serving of all the typical low-code headaches.
First, the local IT team wanted nothing to do with supporting Kofax—some weird tool used by one department? No one was going to dedicate a specialist to figure it out. At least they didn’t ban it outright. Then, one day I show up—and everything they’d scanned over six months is gone. The drive with the archive just disappeared. I go to IT—they shrug their shoulders. “It’s not our system, not our problem.” Later they admitted they’d accidentally wiped it—it wasn’t their responsibility, after all. So, we scanned everything again.
Of course, there was no documentation for the solution. As soon as the business saw the price tag for documenting, they cut that entry from the budget. At the time of setting it all up, that wasn’t a big deal—the product itself was well-documented, and I kept the configuration in my head. But a year or two later, I couldn’t remember what magic I’d created. If something broke—like when documents came in on different paper stock—I basically had to reconfigure everything from scratch.
All that said, low code is a solid technology. It just needs to know its place.
## Low-Code: A Cheeky Term
Marketers were quick to spot the gap between what businesses wanted and what IT could deliver. In 2014, Forrester analysts gave this gap a catchy name: ‘low-code’— and promised that now anyone could build systems without programmers. Business leaders believed it, and for a while, it worked.
But what’s really behind this promise? Low-code doesn’t eliminate programming—it just changes its shape. When you, for example, drag and drop a “Send Email” block, you’re simply calling a pre-written wrapper around an SMTP client. Everything’s already been done—just not by you. But as soon as you want to deviate from the standard scenario, you have to write your own code—not in a familiar IDE, but in some proprietary editor.
Low-code hides complexity, but it doesn’t eliminate it. The architecture and behavior of your system are dictated by the platform. Simplicity comes at the cost of flexibility, and sometimes configuring is harder than traditional programming. The moment your requirements go beyond what the visual designer can handle, you end up fighting the platform instead of building your application.
Still, some kind of aa miracle happened in the market: yesterday’s vendors of ECM, BPM, CRM systems, and 4GL languages suddenly rebranded themselves as low-code pioneers, and the market was flooded with a number of low-code platforms. Of course, nothing really has been changed inside—they just updated their slogans.
## The Forefathers of Today’s Low-Code Platforms
Technically, low-code is built on the same foundations as the tools of past decades: visual modelling, templates, configuration instead of programming, and a declarative approach. We’ve already seen all this in the RAD platforms of the 1990s, 4GL languages, ERP systems, and DSL frameworks. Even Excel with macros has features reminiscent of low-code.
In other words, low-code is not a new technology. It’s a new packaging of an old idea. Here are a few examples to illustrate the point:
– **VisualAge** was a series of visual development environments from IBM in the 1990s that allowed users to build applications by dragging and dropping components and generating code—long before the modern low-code platforms appeared on the scene. The most famous version, VisualAge for Java, later became the foundation for the Eclipse IDE. Although VisualAge was ahead of its time with its visual programming concept, it was too heavyweight and developer-oriented to become a truly mainstream solution.
– **Visual Basic** appeared in 1991 as a rapid application development (RAD) tool from Microsoft. The word “visual” in its name highlights the platform’s key feature—visual design of user interfaces by dragging and dropping elements (buttons, input fields, lists) directly onto a form, which greatly simplified UI creation compared to traditional programming. Despite the convenience of visual design, Visual Basic is not a low-code platform in the modern sense, since implementing business logic and application interaction still required writing code in the Visual Basic language.
– **PowerBuilder** is one of the veterans of the rapid business application development world, born in the early 1990s at Sybase and long considered a dream tool for corporate developers. It was a powerful visual form builder with its own scripting language, enabling the creation of complex client-server applications much faster than coding everything from scratch. PowerBuilder is still alive and supported today though in the era of clouds and low-code platforms, it’s no longer at the cutting edge, but for many organizations, it remains a reliable workhorse with a rich history.

*This image was generated by ChatGPT, but boxes look almost real! That’s pretty much how I remember them. By the way, I still have a VisualAge box lying around at home—a leftover from old stock. It’s a real collector’s item now!*
As we can see, the history of low-code began long before the term itself appeared. VisualAge, Visual Basic, PowerBuilder—all of them, in their own way, aimed at simplifying development, hiding routine tasks behind visual tools, and shortening the time to a finished product. But each had its limits: as soon as you faced non-standard requirements, the developer still had to “look under the hood.”
Today’s low-code platforms have inherited that same duality: the promise of simplicity—and the hidden complexity that emerges at the next level. The only real difference is that now, the old idea is wrapped in a modern marketing facade and a whole methodology of digital transformation. New terms, old mechanisms—and the same old problems.
## What if you go completely code-free?
Following the rise of low-code, a new wave emerged—*no-code*, as a more radical version of the same idea. In essence, it’s the same approach, just taken to the extreme: absolutely no code, not even a hint of programming. Just a mouse, ready-made blocks, a visual editor, and the dream that now the business can build whatever it needs on its own.
The idea sounds appealing: any employee can assemble a working application, automate a process, or create a simple CRM. The reality, as usual, is different. As long as the task is simple and straightforward—like building a landing page in **Tilda**, creating a survey in **Typeform**, or setting up an integration in **Zapier**—everything works. But as soon as the business process goes beyond the capabilities of the builder, the real challenge begins: missing APIs, insufficient logic, lack of validation, and so on. Most importantly, there is no real understanding of how things actually work.
No-code creates the illusion of independence from developers. But rather than making developers unnecessary, you simply end up needing them later—often to fix, rewrite, or integrate whatever was quickly assembled. Instead of removing technical debt, no-code solutions quietly allow it to build up behind the scenes.
Low-code is at least honest: you have to code anyway, but a little. No-code promises that you won’t need any at all. But they forget to mention that you won’t need code only until you want something real: scalability, version control, testing, complex logic, security.
Fortunately, businesses haven’t fallen for this trap, and no-code hasn’t found a place under the corporate sun. Its niche is quick-and-dirty solutions that don’t aim for anything serious—building a small website, automating a simple process for a small business, and so on. In short, you can forget about no-code if we’re talking about serious systems.
## The Less Code Paradox
I don’t think I’ll surprise anyone by saying that most developers can’t stand low-code and everything associated with it. What’s especially ironic is that these same developers love tools that save them from repetitive tasks and boilerplate code, and they eagerly use high-level abstractions to write less code by hand.
Still, the amount of code in large projects doesn’t actually decrease—after all, you can’t describe complex things in just a few lines. What has changed is that developers no longer have to spend time on monotonous work: libraries, smart IDEs, frameworks, and now AI assistants take care of the routine, letting developers focus on truly interesting problems. But I’ll talk more about AI capabilities another time.
Take **Lombok**, for example—isn’t it low-code? A few annotations replace the tedious typing of constructors, getters, setters, and other boilerplate stuff that your code simply can’t run without. Lombok saves hundreds of lines and hours of work, and it does so at the language level, while remaining transparent to the developer. **IntelliJ IDEA** offers something similar, letting you generate all that boilerplate with just a couple of clicks—which is great, because it gives developers a choice.
And what about the mighty **Spring** framework? It truly encapsulates complexity and takes over bean management, but in return it offers developers clear rules and a rich set of features. It says, “I’ll set up the environment for you, connect the necessary components, and handle transactions—just describe what you need, not how it should work under the hood.”
So, modern tools are all about helping developers write less code and think more. In fact, these tools should have rightfully been called “low-code”, but the term was already taken. As a workaround, the term “less code” was coined—not as catchy or transparent, but at least honest. Less code is about saving effort without pretending that code is no longer needed. It’s about raising the level of abstraction, automating routine tasks, and focusing on expressiveness. Developers still write code, but they do it faster, cleaner, and with the help of powerful tools: DSLs, templates, generators, annotations, smart IDEs, and so on.
The fundamental difference between low-code and less code is this: with low-code, you really do write very little code, but everything else is a “black box”—platform components you can’t inspect or modify. With less code, everything is code, whether written by hand or generated by tools. Even the framework itself is code, you can read and modify it if necessary.
After that, you compile and run your application, just like you would with a simple “Hello, world!” In contrast, a low-code application runs in its own runtime environment, which you also don’t control.
So, unlike low-code, less code doesn’t promise that anyone can “build an app in an evening.” It simply says: you’re still a programmer, but you’ll save time on repetitive tasks. And that’s an honest deal—no misleading promises, no loss of control.
The irony is that real progress in software development is happening along the path of less code, not low-code. But the market loves flashy names, and “low-code” sounds more revolutionary. In reality, though, it’s more about rebranding than real change.
## Conclusion
Low-code is neither evil nor a panacea. It’s a tool—a good one, in the right hands and with the right expectations. The problem isn’t that it exists, but that it’s been credited with too much: simplicity, universality, speed, independence, even a kind of revolutionary potential. But these are all marketing illusions:
### 1. The Illusion of Simplicity
Low-code seems simple—until you step outside the boundaries of its visual tools. The complexity doesn’t disappear; it just goes into hiding. But it always comes back, often with a vengeance. Yes, low-code lowers the barrier to entry, that’s true. But sooner or later, you’ll still have to dive deep into the proprietary product.
### 2. The Illusion of “Citizen Developers”
Low-code promises that anyone can succeed—that any specialist can become a citizen developer. In reality, professional developers still get involved: maybe later, but always on call. They come in to sort things out, fix, or rewrite. In theory, you could set up a division of labour between citizen and professional developers, but in practice, this is rare.
### 3. The Illusion of Speed
Low-code claims that everything can be done quickly. That’s true if your scenario is standard. But for non-standard tasks, things get complicated: configurations, platform limitations—all of this eats up time. Think ahead about where low-code is applicable, so you don’t get stuck in a project forever.
### 4. The Illusion of Low Cost
Low-code lures you in with a low-price tag, but that works only at the beginning. The real cost for an enterprise project can be quite substantial. Licenses, customization, integrations, and training quickly turn “cheap” into “not at all.” Make sure to estimate the total cost of ownership before jumping into a low-code solution.
### 5. The Illusion of Universality
Low-code claims to be suitable for every situation. Actually, it is not. This technology is great for automating simple processes or building prototypes. But using it as the core of a corporate system is a recipe for disaster.
### 6. The Illusion of Simplified Maintenance
Low-code offers its own deployment and delivery tools. That’s great—until you need to integrate everything into your corporate DevOps pipeline. That’s when the real fun begins. Mature platforms partially solve this problem, but the cost of integrating with DevOps remains high.
### 7. The Illusion of Revolution
Low-code arrives as a cutting-edge technology. In truth, it’s an old idea with a new name. RAD, 4GL, visual builders—all of this has been around before. Low-code just has better marketing.
Therefore, the main advice is this: **don’t be tempted by illusions**. Use **low-code** where it truly makes sense. But when reliability, scale, and flexibility are required, it’s better to stick with professional **less code** tools.
Source: Seven Illusions of Low Code
Modern frameworks like React enable the efficient creation of visually appealing and functional interfaces. But is React the only option? What other tools can effectively support business application development.## Introduction
Historically, enterprise software development centered on desktop applications with utilitarian user interfaces—dominated by tables, buttons, forms, and multiple pop-up layers. Businesses were typically cautious about change, especially when it involved added costs, making aesthetically pleasing UIs rare in business applications.
Today, modern frameworks like React enable the efficient creation of visually appealing and functional interfaces. But is React the only option? What other tools can effectively support business application development?
## Key Requirements for Business Interfaces
To begin with, consider reviewing a typical business interface using the example of an application from [SAPUI5 Demo](https://sapui5.hana.ondemand.com/test-resources/sap/m/demokit/orderbrowser/webapp/test/mockServer.html?sap-ui-theme=sap_horizon_dark#/Orders/7311/?tab=shipping):

While this looks rather utilitarian, critically, it fulfills its purpose. The interface shows all available orders, with detailed information, and provides filtering options. However, the UI could definitely be improved. The spacing and alignment of the recipient’s card are unclear, the splitter is misaligned, the search control buttons are different sizes, and so on.
In practice, no one will fix this, because, in an enterprise application, visual polishing is never a top priority. Users don’t expect to be spoiled by high-end aesthetics, and so most developer time will be spent fulfilling “what it does” requirements, rather than “how it looks”.
Even from this small example, we can identify several areas to focus upon:
1. More Data = More Screens. A typical business application may have more than 50 different entities in its database. Therefore, multiple screens are necessary to manage these entities. Even with basic CRUD operations for each entity, you will end up around 100 similar screens (one view screen and one edit screen for each).
2. Functionality. Ideally, every business user would experience the same level of functionality that they enjoy with Excel. But this is impractical with web technologies. To bring users closer to this ideal, developers have included various data interactions tools such as filters, logical grouping, sorting, and the ability to modify the table structure in the interface. However, these tools can clutter the interface, making it harder to focus on the main task at hand.
3. Security. It’s not uncommon for enterprise application developers to spend up to 40% of their project time configuring access rights. Why is this the case? Well, even the most basic business app requires at least two roles: a system user and a system administrator. In reality this is often expanded to department heads, several managers, and a support specialist who also needs access to certain screens. If only the support specialist and department head need access to a particular screen, you’re already looking at more than six roles. All of these different roles must be taken into account when designing the UI. This makes it challenging to assemble all of the necessary UI elements for each role.
4. Cheaper Means Better. The primary goal of any business is to maximize profits and complete projects within budget, which requires minimizing expenses. Therefore, extra budget is usually not allocated for aesthetics, especially when it comes to internal business systems.
## Technologies
Now that we’ve discussed the requirements, let’s take a look at the technologies that best suit them.
The backend is relatively simple. Typically, it can be implemented using Python with Django or Java with Spring Boot. However, for large-scale enterprise solutions, Java has become the de-facto standard for backend development, so let’s focus on that approach.
Choosing a frontend technology, on the other hand, is a much more complex process. We need to find something that is cost-effective (refer to point 4) and visually appealing. Popularity and trends in this area are constantly changing, but some of the standard options include React, Next, Angular and Vue. We will choose the most popular and flexible option among these – React.
With the foundation laid, it’s time to define our opponent. The chosen technologies will be compared to Jmix, a ready-to-use solution that has been tailored to meet the requirements we have outlined for enterprise applications. Jmix is a full-stack Java framework designed to build enterprise applications.
For the comparison, we’ll use implementations of a standard Petclinic CRUD application built with Jmix and React + Spring Boot respectively.
## About the Architecture
In this comparison, we are looking at a widely recognized standard and a niche solution. The difference begins at the application architecture level. A web-application built with the Java Spring + React has a straightforward structure.
– Building the Backend
– Entities
– Repositories for entities
– Services to work with the entities
– Validators
– DTOs for entities
– Mappers
– REST-controllers
– Building the Frontend
– Components for editing and viewing lists of entities
– API requests and binding data to components
– Setting up routing within the application
– Configuring validation for UI components and filters
– Styling
With Jmix, things become quite interesting. It is a full-stack solution with a backend based on Spring Boot. The UI is built using the Vaadin Flow framework, which might come as a surprise at first.
Vaadin uses the server-side rendering method, where the server maintains the state of the entire interface. It is a web framework built on the Web Components specification and the Google Polymer library. The server-side of Vaadin is written in Java, so in Jmix, the backend and frontend are both written in the same language – Java.

With this approach, there is no way for the UI state to change without the server eventually learning about it through a synchronization request. This solves many security issues. To create reusable components, Vaadin uses the concept of custom elements, which is similar to the component concept in React. You can also use JavaScript and TypeScript to create custom web components.
## Start a Project
To start a project using native React, you’ll need to use the create-react-app tool which will help you set up the project structure. You’ll also need to configure Webpack, install the necessary npm modules and, for Spring Boot projects, use Spring Initializr to generate applications and define application properties. Finally, you can set up Spring configuration as needed.
Here is where Jmix starts to show its advantages as a full-stack development framework. Jmix offers a predefined set of templates and extensions. The standard template creates a full-stack application with a basic user entity, screens for editing, and a role management system. Naturally, these types of templates limit customization options, something to be aware of.

## Creating Screens
Let’s take a look at the ‘Pets’ screen in the React application. To create this interface, we needed to write some basic layout, fetch data from a backend using a REST API, map the data into a table row component, and then render it on the page.
);
}
“`
This is a basic implementation with inline editing buttons. This approach was chosen to avoid the need for implementing row selection functionality. There are also simple buttons that simply redirect to the corresponding pet creation/editing screens. The Remove button has a ‘delete’ function, which we will discuss later.
Now let’s take a look at the same screen in Jmix. Jmix has a built-in screen generator for creating CRUD screens for entities. This generator uses predefined templates to populate the screen with the necessary columns and form fields based on the entity data. All the components used are based on the Vaadin Flow library.

What does it take to create a screen like this in Jmix?
A screen in Jmix is defined using a controller and an optional descriptor. This controller is a Java class that represents the UI screen. The descriptor is an XML file that defines the layout of the screen, making the code more concise and easier to read. The generator automatically creates both the controller and the descriptor for each screen.
If you need to create screens for more than 12 entities, having a generator like this is much more convenient than manually creating each layout.
“`
“`
In the generated code, you can find declarative definitions for the table, its actions, the buttons above it, and various filters. Overall, this is sufficient to make the screen fully functional. The framework provides all standard entity operation out-of-the-box.
## Woking with Data
To retrieve data from a server in a React application, you need to send a REST request. For example, on the “Pet” screen described earlier, this is how it works:
“`
componentDidMount() {
fetch(“/api/v1/pets”, {
headers: {
“Authorization”: `Bearer ${this.jwt}`,
“Content-Type”: “application/json”,
},
}).then((response) => response.json())
.then((data) => this.setState({ pets: data }));
}
“`
When the screen loads, a single request is sent to the server.
Let’s now examine what happens when you click the Remove button. To delete data, another request must be sent to the server.
“`
async remove(id) {
await fetch(`/api/v1/pets/${id}`, {
method: “DELETE”,
headers: {
“Authorization”: `Bearer ${this.jwt}`,
Accept: “application/json”,
“Content-Type”: “application/json”,
},
}).then((response) => {
if (response.status === 200) {
let updatedPets = […this.state.pets].filter((i) => i.id !== id);
this.setState({ pets: updatedPets });
}
return response.json();
}).then(function (data) {
alert(data.message);
});
}
“`
Overall, this is not too difficult, but it does require a fair amount of coding, especially when you take into account the backend request handling.
In Jmix, data loading is managed using the dedicated data section within the same screen definition. It utilizes built-in mechanisms to retrieve data directly from a database.
“`
“`
A JPQL query is defined directly in the XML code, specifying how data should be retrieved from the database. If you need to handle UI component events, you can do so in the controller by writing Java code.
“`
@Route(value = “pets”, layout = MainView.class)
@ViewController(“petclinic_Pet.list”)
@ViewDescriptor(“pet-list-view.xml”)
@LookupComponent(“petsDataGrid”)
@DialogMode(width = “50em”)
public class PetListView extends StandardListView {
The main difference between React and Jmix is that we work on the backend. When a button is clicked, we can directly call a service, perform additional data processing, or interact with a database.
Layouts are written in XML and screen controllers in Java… At first glance, this might seem similar to Spring MVC, but there are some key differences. Here’s a comparison table:
Jmix UI
Spring MVC
Layout technology
Proprietary layout system using declarative UI components in XML
HTML templating engines (Thymeleaf, Freemarker, etc.)
Client-side communication
JSON used to configure web components
Static HTML delivery
Navigation technology
Vaadin Flow React Router
Mapping of HTTP requests to controllers
Speaking of navigation, let’s move on to how it’s implemented in React and Jmix.
## Creating Routing
So, we have screens in our application and data is being loaded. Let’s examine how we navigate between these screens.
In the React application, a simple Navbar component is implemented as a horizontal menu at the top of the page.
// etc.
}
“`
In Jmix, the role system is designed so that each role contains information about which screens the user can access. Roles are defined using annotated interfaces. For example, here’s how the Nurse role is defined.
This interface uses special annotations (policies) to control access to different parts of the application
– The @MenuPolicy annotation is used to grant permission to display certain menu items. This allows users to see and interface with specific menu options.
– Similarly, the @ViewPolicy annotation controls access to different screens or views within the application. It determines which screens a user can access based on their permissions.
There are also policies related to entity access, but they are not the main focus of this comparison.
In addition, it is possible to create roles within the running application. This allows not only developers, but also system administrators, to define roles and manage access to different parts of the system.
Routing in Jmix is defined using the @Route annotation on screen controllers. These routes support both routeParameters (e.g., an entity ID in an editor screen) and queryParameters (custom screen state options).
To define the menu structure and screen order, you can use a special XML file:
“`
“`
You don’t need to specify which screens are available for each role separately – just define the entire menu, and Jmix will filter it based on the user’s access permissions.
Here’s what the menu would look like for a user with the Nurse role:
As shown, the security and datatools sections from the menu.xml file is missing. These sections have been automatically filtered out by the built-in security system.
## Obvious Drawbacks
### Customization and Flexibility
When relying on predefined components and approaches, customization options may be limited. You are forced to follow a path envisioned by the developers of the framework. However, with React, this is not a problem – it gives you the freedom to create any interface, regardless of its complexity or functionality.
Although there is an option to style the application using CSS, the web components template is fixed. This means that you can’t simply add additional functionality to, for example, a table – you will either need to modify the existing web component or create a new one.
If you wish to integrate a JavaScript library with a visual component, it’s important to understand that both server-side and client-side code will need to be written. This means that you can’t simply “plug in” the JS component as it is; instead, you’ll need to integrate it into your project’s infrastructure. This process can be time-consuming and requires substantial effort, as it involves customizing the library to suit your specific needs.
### Scalability
Since Jmix uses a server-side UI approach, it naturally requires more resources, especially server-side. When a user session is created, an instance of the UI is created on the server and occupies memory. As a result, you need to have a precise understanding of the number of concurrent users in order to provide enough computing resources.
### Session Replication
In addition, storing both the UI state and the session on the server presents challenges related to sessions replication.
First, in order for replication to work, all UI states must be serializable. While all standard Vaadin components are serialized by default, it is not guaranteed that a custom visual component will also be serialized.
Second, remember that we’re in the world of Java. A session is a Java object – a potentially large one – with many references to other Java objects. This can easily increase the size of the session to several megabytes.
Third, every client request to a Jmix application modifies the session state to some extent. Event in simple cases where no application-level data is changed, synchronization points update their state. This means it’s crucial that multiple requests for the same session are never processed in parallel.
All of this leads to a situation where standard session replication solutions don’t work well with Vaadin and Jmix. The only viable option is sticky sessions, which is not always convenient. This is one of the main drawbacks of the Vaadin framework.
### Community
React has one of the largest communities in the world of frontend development. There are a vast number of pre-build solutions, questions answered on forums, and documented workarounds – often at the top of Google’s search results.
Obviously, the Jmix developer community is smaller compared to React, but it is still active. There is a dedicated forum where developers and users can find extensive support from each other. Additionally, a growing number of educational materials and demo applications are available.
## Conclusion
It seems that in certain cases, using React for building business applications may be overkill. At the very least, you’ll need two specialists – each responsible for their own part of the project. However, with a niche solution such as Jmix, the same work can be done by a single developer. This allows for a more streamlined process, while still producing a modern functional, and visually appealing interface. Additionally, code generators can significantly accelerate the creation of repetitive CRUD screens.
This approach has some drawbacks, and one of them (the session replication issue) can be critical. However, for building business-oriented applications with heavy data load, using Jmix seems to be a more reasonable and efficient solution compared to the traditional Spring Boot + React stack.
Source: Beyond React: a comparative analysis of React and Jmix for writing UI business applications
In this webinar we dive into different delivery models supported by Jmix.The webinar explored how product teams can efficiently build and deliver scalable, maintainable digital products using the Jmix platform. It focused on solving common problems in B2B software delivery like managing endless client customizations, code forks, and growing maintenance costs.
Viktor Fadeev, Jmix Product Manager, introduced Jmix as a rapid app development platform for Java teams. It combines a powerful framework, visual Studio plugin for IntelliJ, and a marketplace of ready-made add-ons. With Jmix, teams can build digital products faster, with a clear structure and using full-stack tools.
The session covered three key delivery models supported by Jmix:
**Extension Model**
Package core functionality into reusable add-ons, and allow client-specific extensions without changing the base code. Great for niche products where each client has different needs.
**SaaS Model**
Use Jmix’s built-in multi-tenancy features to deliver one shared application for many clients. Ideal for scaling across SMBs. But as the product grows, you’ll need to manage challenges like performance, database scaling, and customization limits.
**Self-Hosted Model**
Perfect for industries with strict regulations. Deliver isolated deployments with full control and source code access. Jmix’s composite projects help split large systems into manageable modules, reducing duplication and improving development speed.
**Key Takeaways**
– “Copy-paste and pray” doesn’t scale – modular delivery is essential for long-term success.
– Jmix helps avoid code forks with clear boundaries between core logic and client-specific features.
– Multi-tenancy is available out-of-the-box and works well for SaaS models with minimal customization.
– Composite projects simplify self-hosted delivery, especially for complex enterprise clients.
– Early consulting and training reduce risk – get architecture right from the start.
**Summary**
Jmix offers the tools and structure needed to quickly deliver robust, scalable digital products. Whether you’re targeting niche clients, growing SaaS, or serving regulated industries, picking the right delivery model makes all the difference.
Overview of the new features and important changes of the Jmix 2.6 feature release.We are pleased to announce the release of Jmix 2.6, which includes new features, enhancements, and performance improvements. This release brings significant updates to Jmix Studio, introduces new UI components, and boosts productivity with smarter tools and integrations.
Below is a quick overview of Jmix 2.6’s key features.
## Studio Improvements
### Jmix AI Assistant
The Jmix AI Assistant is now integrated into Jmix Studio tool window. This assistant shares chat history with the web-based version, enabling seamless transitions between Studio and web browser, so you can pick up right where you left off.
Jmix 2.6 adds over 20 new UI-related code snippets, covering notifications and dialogs, opening views and fragments, asynchronous execution, and API examples. These snippets make it faster and easier to implement common UI patterns in your projects.
### Moving Views
Relocating views is now simpler with the _Move View_ context menu action in the Jmix tool window. This feature moves both the Java controller and XML descriptor together, automatically updating message keys in the message bundle. Additionally, when moving a Java controller or XML descriptor in the Project tool window, Studio prompts you to relocate the corresponding file and update message keys.
### Scaffolding Renderers
Generating renderers for UI components, such as `dataGrid` columns, is now more intuitive. Studio offers a wizard to scaffold `ComponentRenderer`, `TextRenderer`, or an empty handler method, simplifying the creation of custom UI renderers.
### Replacing Strings with Localized Messages
A new _Replace with localized message_ intention action, available in both Java and XML code, lets you quickly replace string literals with localized messages from the message bundle.
For example, imagine that you have the following code in a view descriptor:
“`java
@Subscribe
public void onInit(final InitEvent event) {
someLabel.setText(“Hello World”);
}
“`
Put cursor on the “Hello World” string and press `Alt-Enter`. Select *Jmix: Replace with localized message* action, and Studio will show a dialog for creating a localized message. After entering the message key and clicking *OK* the code will be changed to the following:
@Subscribe
public void onInit(final InitEvent event) {
someLabel.setText(messageBundle.getMessage(“label.text”));
}
“`
### Lombok Support
Studio now supports `@Getter` and `@Setter` annotations on entities and `@RequiredArgConstructor` on Spring beans, avoiding redundant code generation. It also warns developers about using `@EqualsAndHashCode` or `@Data` annotations on entities, which can cause issues due to incorrect equals/hashCode implementation.
### Performance on Large Projects
Performance has been significantly enhanced for large projects. The Jmix tool window’s project tree and resource role designer now operate smoothly, even in projects with over 1,000 entities.
## New UI Components and Features
### Switch Component
Introducing the new **Switch** component, which allows users to toggle between two states (e.g., on/off or true/false). Designed to resemble a physical toggle switch with a sliding handle, it adds a modern touch to your UI.
### Tabbed Application Mode Improvements
The **Tabbed Application Mode** add-on is now production-ready with several enhancements:
– The `mainTabSheet` component is explicitly defined in the main view layout, supporting actions via the tab context menu or keyboard shortcuts and ability to drag-and-drop tabs.
– The `@TabbedModeViewProperties` annotation for defining view parameters in tabs.
– Preserved UI state and firing `UIRefreshEvent` on web page refresh.
The `codeEditor` component now supports autocompletion for specific language modes or custom suggestion handlers.
### HorizontalLayout Slot Placement
The `hbox` component now supports adding components to `start`, `center`, or `end` alignment slots, offering simplified component positioning within the `HorizontalLayout`. For example:
The **Message Templates** add-on now supports _Export_ and _Import_ actions, enabling easy transfer of templates between applications.
## REST DataStore Enhancements
The REST DataStore add-on simplifies invoking remote services exposed via REST API. Now you only need to create an interface mirroring service methods and annotate it with `@RemoteService`.
The add-on now includes the `restds_RestOidcAuthenticator` bean that allows you to use an external authentication provider (for example Keycloak) when integrating applications.
## Masquerade UI Testing Library
Jmix 2.6 introduces Masquerade, an end-to-end UI testing library tailored for Jmix applications. Built on Selenium WebDriver and Selenide, Masquerade simplifies testing by providing convenient wrappers and streamlining access to web element functions.
## Updated Dependencies
The Jmix 2.6 release includes updates to major dependencies:
– Spring Boot has been updated to version 3.5.
– Vaadin has been updated to version 24.7.
These updates ensure that Jmix continues to be built on a modern, secure, and performant foundation.
## Future Plans
The next feature release is expected in October 2025. We will focus on the following functionality:
– Grouping DataGrid component
– UserMenu component
– Data model visualization
– SAML add-on
– Ability to define reports in Java code
– Reverse engineering: generate attributes from database columns for already mapped entities
## Conclusion
Jmix 2.6 introduces powerful new features and enhancements designed to boost developer productivity and enrich application capabilities.
If you have a question, want to share feedback, or simply connect with others, join us on the forum or Slack.
A big thank you to everyone in the community for your valuable contributions. We hope Jmix 2.6 brings even more success to your projects!
Source: Jmix 2.6 Is Released
In this article, we talk about process variables: what they’re for, how they differ from programming variables, and how scope works.This article continues the BPMN: Beyond the Basics series – a look at the practical, less-discussed aspects of working with BPMN for developers. Today, we’ll talk about process variables: what they’re for, how they differ from programming variables, and how scope works. At first glance, it might seem like there’s nothing special about them, but if you dig below the surface, there’s more nuance than expected. In fact, we couldn’t fit it all into one piece article, so we’re splitting this topic into two parts.
## Data in a Process
Process modeling traditionally begins with actions: approve a document, submit a request, sign a contract, plant a tree, deliver a pizza. Data is often left in the background, as if the performer intuitively knows where to get the right document or which pizza to deliver.
That works in human-centered, descriptive processes. People are expected to understand context, navigate loosely defined inputs, and follow general instructions. That’s why process models often resemble enhanced job descriptions more than software logic.
But when we move into automation, especially full automation, the game changes. A process without people must be **explicit about how it handles data**. It becomes not just a chain of steps, but a **data processing mechanism**. And if you want that mechanism to run fast and reliably, you need to understand how data is passed in, stored, transformed, and retrieved.
In short, a business process without data is like a horse without a cart — it might go somewhere, but it’s not carrying any value.
## Data-Centric Processes and BPM Engines
Even though classic processes like document flow and multi-step approvals are still important for many companies, the shift toward full automation is well underway. Gartner predicted that by 2025, 70% of organizations will have adopted structured automation—up from just 20% in 2021. And the whole workflow automation market? According to Stratis Research report, the workflow automation market is expected to top $45 billion by 2032, which shows just how much everyone wants to automate everything from start to finish.
Why the rush? It’s mostly about cutting down on mistakes, saving money, and speeding things up. Some studies (Gitnux) say automation can reduce errors by as much as 70% and lets people focus on more interesting, higher-value work. So, fully automated processes—where data processing and orchestration are front and center—are quickly becoming the new normal in digital transformation, not just a nice-to-have.
Let’s see how ready our BPM engines are for this. Spoiler: not very.
“BPMN does not provide a comprehensive data model. Data Objects and Data Stores are used to show that data is required or produced, but their structure is not defined.”
— “BPMN 2.0 Handbook: Methods, Concepts, and Techniques for Business Process Modeling and Execution” (2011)
“BPMN is not intended to model data structures or detailed data flows.”
— Bruce Silver, “BPMN Method and Style” (3rd Edition, 2016)
BPMN notation was originally created as a language for describing processes and does not include data models. Everything related to data in it is limited to so-called “`Data Objects“`, which only hint that some kind of data or documents are used in the process (judging by their icon). There is also the “`Data Store“`, which pretends to be a database or some information system, again based on its appearance.
In essence, these are just graphical symbols. Their role is limited to informing the diagram reader that some data exists in the system and there is interaction with storage. There is no engine-level implementation behind them.
As a result, we have a situation where there are clear rules for modeling the process itself according to the BPMN 2.0 standard, which are implemented in a very similar way (if not identically) across engines. But there is no unified mechanism for working with data — each developer decides how to handle it on their own.
On the one hand, this is good — freedom! You can choose the optimal solution for your tasks. On the other hand, the lack of clear rules often leads to fewer than ideal data handling solutions in projects.
## Why Do We Need Process Variables?
So, at the BPMN model level, we don’t have data as such — the diagram describes the structure and logic of the process but does not operate directly with variables. However, when the process is executed, data becomes necessary: somewhere you need to save user input, somewhere to make a decision, and somewhere to send a request to an external system. All this data exists in the form of process variables, which are “attached” to each process instance and accompany it throughout its execution.
Broadly speaking, process variables fulfill four roles:
– Data transfer between steps
– Process flow control
– Interaction with the user
– Integration with external systems
Process variables help carry information through the entire process, from start to finish. For example, a user fills out a loan application form, and the data they enter (amount, term, loan purpose) is saved into variables. Then these values are used in service tasks, passed to gateways, and determine which branches should be activated. In one branch, a variable may be updated or supplemented and then passed further, for example, to a verification or notification task.
They also allow us to control the behavior of the process during execution. Suppose we have a variable called “`priority“`, calculated based on the application parameters. If, at the process start, it equals “high,” the task is automatically routed to a specific specialist; otherwise, it goes into a general queue.
When the process interacts with a user, variables become the link between the form and the process logic. They are used both to display data and to receive user input. If a variable was already set on a previous step — for example, “`userEmail“` — its value can be shown in the form. The user, in turn, fills in other fields, and their values are saved back into variables to be used later in the process. Thus, the form works as a “window” into the current execution context: everything the process knows at this point is available to the user, and everything the user enters remains in the process.
Finally, process variables are a communication channel with the outside world. When a service task calls a REST API, it can use variables as input parameters and save the response to a variable. This response can then be analyzed, logged, passed to another service, or displayed to the user.
## The Lifecycle of a Variable
Now let’s talk about how process variables are born, live, and end their lifecycle. To do that, we first need to look at how they are structured.
In BPM systems such as Camunda, Flowable, or Jmix BPM, process variables are objects that store not only their value but also metadata about themselves. In other words, they’re not simple variables like in Java or another programming language — they’re containers that hold data.
Why make it so complicated? Because a process can run for a long time — hours, days, or even months. That’s why the values of variables need to be stored in a database, so they can be retrieved later when needed. And if we write something to the database, metadata appears as well—it’s only logical.
### Creation and Persistence of Variables
Note: The examples in this section are based on the Flowable engine.
So, data has entered the process — for example, as a payload in the start message, in the form of a “`Map“`. What does the engine do next? First, it creates a process instance — “`ProcessInstance“` — and initializes its execution context. Then the engine automatically saves all passed variables into this context using the “`setVariable“` method. But it’s important to understand: the engine doesn’t just “store” values somewhere in memory. It wraps each variable according to its type into an internal entity called “`VariableInstanceEntity“`, making the variables immediately accessible throughout the process — in scripts, transition conditions, tasks, and so on.
Additionally, a developer can create a variable in code whenever needed, also using the “`setVariable“` method — including from Groovy scripts:
As long as the process hasn’t reached a transaction boundary, no database writing occurs. The variable remains in an in-memory structure — a “`List“` within the “`ExecutionEntity“`. This is convenient: the next task or script can be used without hitting the database.
However, once the process hits a wait state — such as a message or signal event, timer, user task, event-based gateway, or asynchronous task — the transaction is committed, and all entities created or modified during the transaction are flushed to the database. This includes process variables, which are written to the “`ACT_RU_VARIABLE“` table.
If the variable type is a primitive, it is stored as-is in the corresponding field of the table. Non-primitive variables, on the other hand, are serialized before being saved — and stored either as strings or byte arrays.
### Table Fields (Translated from Russian)
| Field | Type | Purpose |
|—————|——————|———————————————————————————————————————————————-|
| `id_` | `varchar(64)` | Unique variable ID. Primary key of the table. |
| `rev_` | `integer` | Record version (used for optimistic locking when updating the variable). |
| `type_` | `varchar(255)` | Variable type (e.g., string, long, boolean, serializable, json, object, bytearray, etc.). Determines which value fields are used. |
| `name_` | `varchar(255)` | Variable name. |
| `execution_id_`| `varchar(64)` | ID of the specific execution the variable is linked to. |
| `proc_inst_id_`| `varchar(64)` | ID of the process the variable belongs to. Used for retrieving variables by process. |
| `task_id_` | `varchar(64)` | Task ID if the variable is scoped at the task level. |
| `scope_id_` | `varchar(255)` | Used only in CMMN. |
| `sub_scope_id_`| `varchar(255)` | Used only in CMMN. |
| `scope_type_` | `varchar(255)` | Scope type (bpmn, cmmn, dmn). Not actually used in practice. |
| `bytearray_id_`| `varchar(64)` | ID of the entry in the `act_ge_bytearray` table where the variable value is stored (if it’s a byte array or a serialized object). |
| `double_` | `double precision`| Variable value if the type is double. |
| `long_` | `bigint` | Variable value if the type is long, integer, short, or boolean (as 0/1). |
| `text_` | `varchar(4000)` | Variable value if the type is string, json, date, or uuid. May also hold serialized values as text. |
| `text2_` | `varchar(4000)` | Additional text field, e.g., for serialization format or extra parameters. May be used in JSON/XML serialization. |
| `meta_info_` | `varchar(4000)` | Metadata about the variable, such as object class (if it’s a serialized object), or other engine-relevant info. Not used in Jmix BPM. |
Once a variable is written to the “`ACT_RU_VARIABLE“` table, it becomes part of the process’s persistent state. This means that even if the server is restarted, the process can be restored and resumed — along with all its variables. At this point, the cache is also cleared, and the “`VariableInstanceEntity“` objects are removed from memory.
In some cases, however, you may want a variable **not** to be stored in the database, for example, intermediate calculation results that aren’t needed in later steps of the process, or sensitive data like passwords, authorization tokens, and similar. In such cases, variables can be declared **transient** and will be kept in memory only. But this is up to the developer — by default, all variables are persistent.
### Reading and Updating Variables
Now let’s take a look at how variable reading works.
After one transaction is successfully completed, the next one begins, and a new variable cache is created. Initially, this cache is empty — variables are not loaded by default. Only when a variable is actually needed does the engine execute a command like:
“`String status = (String) runtimeService.getVariable(executionId, “docStatus”); “`
First, the engine locates the corresponding “`ExecutionEntity“` using the given “`executionId“`. This is the **execution context** that holds variables associated with a specific active step of the process. If the variable is not yet in memory, the engine issues an SQL query to the “`ACT_RU_VARIABLE“` table. The retrieved object is then deserialized (if necessary), added to the “`ExecutionEntity“` cache, and returned to the calling code.
If you need not just the value but the full variable information including metadata, you can request a “`VariableInstance“` object:
Keep in mind, though, that this is a **read-only** object. If you want to update the variable, you must call “`setVariable“` again. The new value will be written to the database during the next commit. Technically speaking, this is not an update, but rather the creation of a new variable with the same name.
And here’s a subtle point: the engine does not enforce type consistency. So, if the variable originally held a string, and you later assign a number to it, the engine will accept it without complaint. However, this may lead to issues later — for example, when accessing historical data or using the variable in other steps of the process.
### Deleting Variables
When a process (or execution) ends, its variables are deleted. That is, all entries in the “`ACT_RU_VARIABLE“` table associated with the specific “`executionId“` are removed.
A developer can also proactively delete a variable before the process finishes:
Normally, this isn’t necessary just for “clean-up” purposes — the engine handles that on its own.
However, there are situations where proactively removing variables can be useful. For example, when a variable contains a large amount of data — say, a JSON object several megabytes in size or a high-resolution image. Keep in mind, this data is stored in the database, not in the Java process memory — so we’re not talking about garbage collection here, but about reducing database load.
If a variable contains personal or sensitive data (like temporary passwords or one-time codes) and is no longer needed after use, it should be deleted.
Some variables are used only within a single step (for example, intermediate results). These can be removed after that step finishes to avoid confusion or accidental reuse.
To avoid dealing with deletion altogether, it’s often better to declare such variables as **transient** right from the start.
Transient means that the variable is temporary and not saved permanently (for example, not stored in a database or persisted between sessions). It exists only during the runtime or the current process and disappears afterward.
### Writing to History
A key principle is that historical records for variables are **not** created when the process finishes, but rather **at the moment the variable is set** (“`setVariable“`), if history tracking is enabled. This is controlled by the “`historyLevel“` parameter.
| historyLevel | Description | What Is Stored |
|————–|——————————|——————————————————————————–|
| `none` | History is completely disabled | Nothing |
| `activity` | Minimal history: tracks process activity | Process start/end, tasks, events |
| `audit` | More detailed history | Everything from `activity` + variables (latest value only) |
| `full` | Complete history, including changes | Everything from `audit` + all variable changes (`ACT_HI_DETAIL`) |
By default, the engine uses the “`audit“` level — a compromise between useful historical data and performance.
So, in most cases, history is enabled. When a variable is created, its value is also written to the ACT_HI_VARINST table. More precisely, a “`HistoricVariableInstanceEntity“` is created and inserted into that table when the transaction is committed.
If “`historyLevel = full“`, **every** change to the variable is also recorded in the “`ACT_HI_DETAIL“` table.
**Important Note**
BPM engines do not provide a unified mechanism for working with variables. Variables can appear anywhere — as a field in user form, as a payload in a message or signal, or declared in script code, Java delegates, or Spring beans.
All of this is entirely the developer’s responsibility. Your IDE won’t be able to help. That’s why extreme attentiveness is required. One day, you may want to fix a typo in a variable name — but there will be no way to automatically track down all the places where it’s used.
### Scope
Like regular variables, process variables have scope. But this concept works quite differently in BPM than in programming languages. Just accept it as a fact and don’t rely on intuition — it can easily mislead you.
In programming, a variable scope is defined lexically, — depending on the class, method, or block where it is declared. It doesn’t matter whether the language uses static typing, like Java, or dynamic typing, like Python.
Process variables are something entirely different, as Monty Python might say. Essentially, they are not just variables but runtime objects. Therefore, the lexical approach doesn’t apply here. And although you can declare variables in a BPMN model, it’s not a true declaration like in programming. It’s more like a description of intent — the engine doesn’t require these variables to exist until they are actually set.
For example, in Jmix BPM, you can define process variables in the start event. Such declarations are useful for documentation purposes, so anyone reading the model understands which variables are used. And if the process is started programmatically, explicitly listing the variables helps the developer know what parameters are needed to start it.
But they will not appear in the process by themselves. They must either be passed as parameters or created at some subsequent step using the setVariable method. Otherwise, if you try to access them, the system will throw an error stating that such an object does not exist.
As we discussed in the first part of this article, process variables are created as a result of calling the “`setVariable“` method. Their scope is determined by their “birthplace,” almost like citizenship — that is, the execution context in which they were created.
When a process instance starts, the engine creates a root execution context (the process instance). Then, as the process progresses, these contexts form a hierarchical structure. For example, when the flow encounters an embedded subprocess, a parallel gateway, an asynchronous task, and so on, a new execution context is created. Subsequently, child contexts arise relative to previous ones. Thus, execution contexts form a tree.
Accordingly, the scope of variables is defined by the position of their execution context within this tree. Variables created in a higher-level context are visible in all the lower levels beneath them.
Let’s take a process as an example and mark all its execution contexts:
If we define the variable “`orderId“` at the top level of the process, it will be accessible everywhere. But a variable like “`discount“`, if it is set in the first parallel branch, will only be visible within its own execution context and cannot be accessed later outside of it. So, it’s important to plan variable declarations with their scope in mind.
A nested subprocess not only helps to structure execution logic but also creates a new scope — and this can actually be its more important feature.
A separate story applies to external subprocesses (call activities). Each such call is wrapped in its own execution context. That’s why in the second parallel branch we see another nested execution. But the external subprocess itself runs as a completely separate instance, and by default does not see variables of the parent process. You must explicitly map variables to pass them into the child process — and similarly map them back if needed.
If you have event subprocesses, each one lives in its own execution and waits to be activated. There are no special tricks here — it sees all process-level variables plus its own.
When a multi-instance task occurs on the path, first a common execution context is created (in our example — execution 2) which tracks all instances. Then each instance gets its own separate execution context. A common mistake here is when someone tries to write a variable at the top level from a specific instance — for example, in parallel document approvals. As a result, all approvers overwrite the same variable, and you only see the decision of the last approver. The key here is not to get confused by all these variables, which are often named the same.
This situation is resolved by local variables, which we will discuss below.
## Local Variables
If you set a variable in the usual way, it will be visible to all child executions. But if you use the method “`setVariableLocal“`, it will be “locked” within the current execution and won’t be visible outside of it, including in lower-level contexts.
Okay. But why would you need to guarantee that a variable is not passed down the hierarchy?
Actually, this isn’t the main purpose. Local variables help keep things organized in your process: when you declare a variable as local, you make sure it won’t accidentally overwrite a variable with the same name in a broader (global or parent) scope.
Returning to our approval example: when in each instance of the multi-instance subprocess we explicitly specify that the comment field and the document decision are local variables, the chance of confusion is reduced.
In general, local variables are a mechanism for isolation and error prevention rather than a functional necessity. They do not solve problems that couldn’t be solved otherwise, but they do it more safely and cleanly.
## Variable Shadowing
What if variables have the same names?
This can happen — you create a variable in a child execution context with the same name as one already presented in the parent. In this case, variable shadowing occurs — the parent variable becomes inaccessible in the current context, even though it still exists in the execution tree.
**How it works**
Each execution context contains its own set of variables. When accessing a variable via the method “`getVariable(String name)“`, the engine first looks for it in the current execution. If the variable is found — it is used, even if a variable with the same name exists at a higher level. Thus, the higher-level variable is “shadowed.”
“`// Somewhere at the start of the process
execution.setVariable(“status”, “CREATED”);
// Inside a task or subprocess:
execution.setVariableLocal(“status”, “PROCESSING”);
// What will a script or service see in this execution?
String currentStatus = (String) execution.getVariable(“status”); // “PROCESSING”
“`
Although the parent variable still exists, the child variable overrides it within the current execution. Once you exit the scope of the child context (for example, when the subprocess ends), the higher-level variable becomes visible again.
Variable shadowing can be useful when used correctly, but it also represents a potential source of errors. In some scenarios, it provides an advantage — for example, allowing you to temporarily override a variable without changing its original value. This is especially convenient in multi-instance constructs where each instance works with its own copy of data.
However, shadowing can lead to unexpected results if you are not sure which context, you are in. Debugging becomes more difficult: in the history, you may see a variable with the same name, but it’s not always clear at what level it was created or why its value differs.
To avoid such issues, it’s recommended to follow several guidelines. It’s better to use different variable names if they have different meanings or belong to different execution levels.
Also, consciously manage the context in which variables are created and avoid using “`setVariableLocal“` unless there is a clear need. When analyzing process state, it is helpful to check variables at the current and parent levels separately using “`getVariableLocal()“` and “`getParent().getVariable()“` to get the full picture.
## Types of Process Variables
As for variable types, their variety depends on the engine developer — as mentioned earlier, the specification does not define this, so each implementation does its own thing. Of course, there is a common set that includes primitive types — strings, numbers, boolean values, as well as dates. But even here there are differences — compare the two illustrations and see for yourself.
In Camunda, we have one set of data types, while in Jmix BPM (with the Flowable engine) it is somewhat different.
Regarding the basic types, this difference is insignificant and may only become apparent when migrating from one engine to another. But there are some interesting distinctions worth mentioning.
You’ve probably noticed that Camunda supports JSON and XML types. However, this is not a built-in feature of the engine itself — to work with them, you need a special library called **Camunda Spin**, designed for handling structured data within business processes. It provides a convenient API for parsing, navigating, and modifying data, as well as automatically serializing and deserializing data when passing it between tasks. This can be especially useful when processing responses from REST services, storing complex structures as variables, and generating XML/JSON documents.
In turn, Jmix BPM allows you to use elements of the Jmix platform’s data model as process variables — entities, lists of entities, and enumerated types (Enums). This is especially helpful when you need to manipulate complex business objects within a process that contains dozens of attributes. For example, applications, contracts, support tickets, and so on.
Entity Data Task — Accessing the Data Model from the Process
Jmix BPM includes a special type of task called the Entity Data task. With it, you can create new entity instances, modify them, and load individual entities or collections of entities obtained via JPQL queries directly into process variables right from the process. This is not an extension of the BPMN notation per se. Technically, these are just regular service tasks with a specific set of parameters.
Thus, you can model a process in a low-code style — using User tasks for user actions and Entity Data tasks for data manipulation. If no complex integrations or logic are required, this approach is often sufficient.
Let’s consider a hypothetical example. Suppose some data arrives. The system checks whether it relates to an existing customer order or not. Depending on the result, it executes one task or another; either creating a new Order entity or loading/finding an existing one. Then, an employee performs some work, and an Entity Data task updates the modified attributes of the entity.
Of course, a real process would be more complex — this diagram merely illustrates the concept of how you can use an Entity Data task to work with data.
## Limitations
This section outlines the limitations of process variables in different BPM products.
### Camunda
**String Length Limitation**
In Camunda, values of type String are stored in the database in a column of type (n)varchar with a length limit of 4000 characters (2000 for Oracle). Depending on the database and configured character encoding, this limit may correspond to a different number of actual characters. Camunda does not validate the string length — values are passed to the database “as is.” If the allowed limit is exceeded, a database-level error will occur. Therefore, it’s the developer’s responsibility to control the length of string variables.
**Context Size Limitation**
Although process variables are stored in a separate database table, in practice, there is a limit to the total amount of data associated with a process instance. This limit is not so much about the physical storage but rather the internal mechanisms of serialization, memory loading, transactional handling, and other engine internals. A typical safe threshold is around **3–4 MB** per process context. This includes serialized variables, internal references, events, and other metadata. The exact value depends on the DBMS, serialization format, and engine configuration.
Storing too many variables or large documents in the process context can lead to unexpected “`ProcessEngineExceptions“` due to exceeding the allowable size of a serialized object. Therefore, when working with large variables, it is recommended to stay well below this limit and conduct performance testing if needed.
In **Camunda 8**, there is a strict limit on the size of data (payload) that can be passed into a process instance. The total maximum size of all process variables is **4 MB**, including engine internals. However, considering overhead, the safe threshold is around **3 MB**.
### Flowable / Jmix BPM
**String Length Limitation**
Flowable handles strings a bit differently: if the length of a “`String“`-type variable exceeds 4000 characters, it is automatically assigned an internal type of “`longString“`. Its value is then stored as a byte array in the “`ACT_GE_BYTEARRAY“` table, while the “`ACT_RE_VARIABLE“` table contains a reference to it. As a result, Flowable does not impose any explicit limit on string length.
In theory, the length of a string variable is only limited by the Java maximum —
“`Integer.MAX_VALUE = 2,147,483,647“`
(roughly 2.1 billion characters).
However, in practice, the effective limit is determined by available heap memory.
**Entity List Size Limitation**
For variables of type “`Entity List“`, there is a constraint related to the way they are stored. When saved to the database, such variables are serialized into a string format like:
“`.”UUID”“` — for example:
“`
jal_User.”60885987-1b61-4247-94c7-dff348347f93″
“`
This string is saved in a text field with a maximum length of 4000 characters. As a result, the list can typically contain around **80 elements** before exceeding the limit. However, this restriction only applies at the point of database persistence — in memory, the list can be of any size.
**Context Size Limitation**
Flowable (and thus Jmix BPM) does not enforce a hard limit on the size of the process context. Still, it’s recommended to keep the context as small as possible, since a large number of process variables can negatively impact performance. Also, you might eventually run into limits imposed by the underlying database system.
## Process Variables in Groovy Scripts
Scripts in BPMN are often underrated, yet they are a powerful tool—especially lightweight, in-process logic. They’re commonly used to initialize variables, perform simple calculations, log messages, and so on. BPM engines typically support **Groovy** or **JavaScript** as scripting languages, with **Groovy** being more prevalent due to its concise syntax, native Java compatibility, and ease of use when working with process objects. The most important of these is the execution object, which represents the process context and allows you to work with process variables.
Your main workhorses are the familiar “`setVariable“` and “`getVariable“` methods, used to write and read process variables. However, there’s a feature that—while seemingly convenient—can lead to hard-to-diagnose bugs:
**process variables in Groovy scripts are accessible directly by name.**
That means you can reference them in expressions without explicitly reading them first:
“`amount = price * quantity “`
But here’s the catch:
**The assignment operator does not affect process variables.**
So, after that expression, the value of the amount process variable will **not** change. To actually update it, you must explicitly call “`setVariable“`:
This is because a process variable is part of the execution context, not just a regular Groovy variable—it must be handled explicitly.
To complicate things further, Groovy allows you to define **local script variables** on the fly. Since Groovy is a dynamic language, it will silently create a new script variable if one isn’t already defined. So, if you haven’t explicitly created the process variable amount, the following line will still work:
And there’s more to it! Even though Groovy doesn’t require it, **declaring variables explicitly** using def is considered best practice. It helps avoid subtle bugs:
“`
groovy.lang.MissingPropertyException: No such property: counter for class: Script2
“`
This means the variable counter wasn’t available in the script context at execution time.
Why? Because engines like Flowable inject process variables into the script environment **automatically**, but for **asynchronous executions**, this may happen **too late**—after the script has already started running.
To avoid this issue, always **explicitly read** the variable at the start of the script:
“`
def counter = execution.getVariable(“counter”)
execution.setVariable(“counter”, counter + 1L)
“`
And just like that — no more exceptions!
## Best Practices
Working with process variables is a key part of building reliable business processes. Variables allow the process to “remember” data, pass it between tasks, and make decisions. However, without discipline, they can easily become a source of bugs—from subtle logic errors to critical failures. This section outlines proven practices to help you avoid common pitfalls and build a clean, predictable data model in your process.
1. **Use clear and unique variable names**
Choose meaningful and descriptive names. Avoid duplicates.
Good: orderApprovalStatus
Bad: status
2. **The fewer variables, the better**
Keep in mind that the process context isn’t unlimited. Avoid creating unnecessary variables. Even without hard size limits, bloated contexts hurt performance.
Avoid storing large documents or massive JSON structures directly—store them as files and keep only a reference in the process.
3. **Use transient variables for temporary data**
If data is only needed within a single action or expression, define it as “`transient“`. It won’t be saved to the database or show up in history.
4. **Be cautious with entity variables**
Many BPM platforms support storing complex objects (e.g. entities) in process variables. This is convenient for business logic involving entity attributes.
However, if you load an entity into a variable at the start of the process, and later display it in a form days later, can you be sure it hasn’t changed? — Definitely not.
Instead, store the entity’s **ID** as a variable and re-fetch it when needed.
5. **Serialization may surprise you**
When saving complex objects, the engine serializes them before writing to the DB. Not all Java objects can be stored—your object must either implement “`Serializable“`, or you must provide and register a custom serializer.
Also, serialization may behave differently in regular vs. asynchronous tasks, since async tasks run in the “`JobExecutor“` which has a different context.
6. **Link entities to processes**
Often, a process is started in relation to an entity—an order, document, customer request, etc. You may want to navigate from the entity to its process.
Here’s a simple trick: add a “`processInstanceId“` field to your entity. No more searching with complex API queries—just follow the ID.
7. **Don’t blindly pass all variables into a Call Activity**
It’s tempting to tick the box that passes all variables from the parent to the subprocess. But it’s better to explicitly map only the variables you need.
Otherwise, you risk data leaks or serialization issues.
8. **Configure history settings**
The more variables you have, the faster your history tables will grow. All BPM engines support history cleanup mechanisms—take time to configure them.
If you need to keep historical data, create a mechanism to export it from the process DB to your own storage.
Also, be mindful of sensitive data—like credentials or API keys. They might be safe during the process but later get dumped into history with all other variables. And history access might be less secure than the live process.
So, to be safe—**avoid storing sensitive variables in history**.
9. **Use local variables where appropriate**
Technically, you can manage without local variables. But using them helps keep things organized. A clear local variable reduces the chance of errors.
However, don’t overuse them. It’s not necessary to make every child context variable local—sometimes you need them to propagate downward.
10. **Avoid unnecessary variable shadowing**
Variable shadowing (redefining variables in nested contexts) is mostly useful in multi-instance activities.
Outside of that, it’s better to give variables unique names to prevent confusion.
11. **Document your variables**
BPM engines don’t manage variables, and IDEs typically don’t help with this either.
Maintain your own variable registry—describe what each variable is for and where it’s used.
This will make your processes easier to maintain in the long run.
## Conclusion
Managing process variables with care is essential for building robust, maintainable business processes. By following these best practices, you can avoid common pitfalls and ensure your processes remain reliable and easy to support.
Thoughtful variable management not only prevents bugs and performance issues but also makes your process models more transparent for everyone involved. In the end, a little discipline in how you handle variables goes a long way toward creating clean, predictable, and future-proof BPM solutions.
Source: Everything a BPM Developer Should Know About Process Variables
Starting July 1st, 2025, we are introducing an updated subscription model for Jmix. These changes reflect the feedback we’ve gathered from long-term users and our ongoing efforts to keep Jmix sustainable and aligned with real-world development needs.Starting **July 1st, 2025**, we are introducing an updated subscription model for Jmix. These changes reflect the feedback we’ve gathered from long-term users and our ongoing efforts to keep Jmix sustainable and aligned with real-world development needs.
The new structure improves clarity across tiers, lowers the entry barrier for advanced features, and better separates distinct use cases like process automation.
## What’s Changing — and Why
1. **“Free” becomes “Community”**
We’re renaming the Free plan to **Community**. This name better reflects the open-source nature of Jmix and the tools shared across the entire developer base. No changes to features or access.
2. **“RAD” becomes “Sprint”**
While RAD served its purpose for many years, we’re renaming it to **Sprint** to better reflect how most teams work today — fast, structured, and iterative. The feature set remains unchanged.
3. **«Enterprise» becomes more focused and accessible**
With BPM functionality now separated, the Enterprise plan is focused entirely on enterprise-grade development features such as **Maps**, **Kanban**, **WebDAV**, **Notifications**, and **UI Constraints**. Following this restructuring, the plan will be priced **25% lower for companies** and **30% lower for individual developers**.
4. **«BPM» becomes a standalone plan**
Process automation is a distinct application layer with its own architectural and operational needs. To better serve those use cases, we’ve moved all BPM-related functionality — including the engine, process forms, task panel, and admin tools — into a dedicated **BPM plan**, offered at the same pricing level as the former Enterprise tier.
## A Note on Pricing Context
Earlier this year, in **January 2025**, we introduced a moderate price adjustment to reflect platform growth and operating costs. **At that time**, the Enterprise tier included BPM and other advanced tools in a single bundle.
With the July restructuring, we’ve realigned each tier to specific use cases. As a result, the Enterprise plan has a narrower focus, and its pricing has been revised accordingly. These changes are not simply discounts, but a reflection of the updated scope of each plan.
## How These Changes Affect Existing Users
– **Free (now Community)** continue to have full access to Jmix’s open-source core — now under a name that better represents its purpose.
– **RAD (new Sprint) monthly subscribers** will see only a name change. Pricing and access remain unchanged.
– **RAD (new Sprint) annual subscribers** will be automatically moved to the new Enterprise plan and will retain their current RAD pricing until **July 1st, 2027**. This includes full access to all Enterprise features (excluding BPM), including upcoming add-ons like Group Data Grid (coming Fall 2025) and Tabbed Application Mode.
– **After the 2-year transition period**, these users will have the option to continue with **Enterprise at the standard rate**, or return to the **Sprint** plan.
– **Enterprise subscribers** will be upgraded to the new **BPM plan** automatically. No action is needed. Access to all BPM features will continue uninterrupted and pricing remains the same.
## Looking Ahead
These updates are part of our continued effort to keep Jmix competitive, sustainable, and aligned with the needs of Java teams building complex enterprise software. The clearer tier structure also allows us to deliver new features faster and more predictably across the platform.
We remain committed to helping you build and ship high-quality software — faster, with less overhead, and with tools that match the scale of your team.
This article explores why upgrading to Jmix 2 is a strategic move for your development projects.If you’re still using Jmix 1, now is the perfect time to migrate to Jmix 2. Built on a modern, actively supported technology stack and packed with powerful new features, Jmix 2 offers significant advantages over its predecessor. This article explores why upgrading to Jmix 2 is a strategic move for your development projects, enhancing productivity, security, and user experience while future-proofing your applications.
## Modern Technology Stack for Enhanced Security and Performance
Jmix 2 is built on a cutting-edge technology stack, including Spring Boot 3 and Vaadin 24, which are updated with each Jmix feature release every four months. In contrast, Jmix 1 is tied to Spring Boot 2 and Vaadin 8, both of which are no longer officially supported. This means Jmix 1 is limited to critical bug fixes and select security patches, with some third-party dependency vulnerabilities unfixable due to incompatibility with newer versions.
With Jmix 2, regular dependency updates ensure your applications benefit from the latest security patches, reducing vulnerabilities and enhancing safety. Additionally, newer Java versions in Jmix 2 deliver improved performance and modern language features, enabling developers to write cleaner, more efficient code. This forward-looking approach ensures your applications remain secure, performant, and aligned with industry standards.
## Mobile-Friendly and Customizable UI with Vaadin 24
Jmix 2 leverages Vaadin 24 to deliver a mobile-friendly user interface out of the box. Unlike Jmix 1, which requires separate mobile applications or complex workarounds, Jmix 2 supports responsive layouts, allowing you to optimize your UI for mobile devices without additional development effort. This streamlines development and ensures a consistent user experience across desktops, tablets, and smartphones.
Moreover, Vaadin 24 provides greater control over your application’s look and feel. With direct access to DOM elements and straightforward CSS styling, customizing the UI is simpler than ever. Jmix 2 also includes Java wrappers for standard HTML elements like `div`, `span`, `p` and `hr`, making it easier to create tailored, visually appealing interfaces that align with your brand. Additionally, the frontend part of Jmix 2 is now based on the web components standard, significantly simplifying the integration of third-party JavaScript components and libraries, enabling developers to enhance their applications with a wider range of modern tools and functionalities.
## Enhanced Navigation and User Experience
Jmix 2 introduces standard browser navigation for opening views, aligning with familiar web browsing behaviors. Users can now open views in new browser tabs via the context menu and use deep links to access specific application views directly. For those who prefer the Jmix 1 approach of opening screens in internal tabs within a single browser tab, Jmix 2 offers the optional **Tabbed Application Mode** add-on, providing flexibility to suit different preferences.
## New Features and Improvements in Jmix 2
Jmix 2 introduces a range of powerful add-ons and functionalities that are absent in Jmix 1, empowering developers to build more sophisticated applications with less effort:
– **Kanban Add-on**: visualizes project workflows with a Kanban board component, using cards for tasks and columns for project stages.
– **Superset Add-on**: allows you to embed Apache Superset dashboards into your Jmix application views, enhancing data visualization capabilities.
– **UI Constraints Add-on**: manages UI component visibility and accessibility using declarative policies in resource roles, even for components not tied to the data model.
– **OpenID Connect Add-on**: simplifies external authentication with providers like Keycloak, mapping user attributes and roles to Jmix users seamlessly.
– **REST DataStore Add-on**: allows you to easily integrate external Jmix applications, accessing remote entities through the `DataManager` interface as if they were local, with full CRUD functionality.
– **Authorization Server Add-on**: provides authentication for REST APIs in compliance with OAuth 2.1, ensuring secure and standardized API access.
– **OpenAPI Integration in Studio**: configures OpenAPI client generators and automatically generates DTO entities, mappers, and services for integration with external REST APIs.
– **Data Repositories**: built on Spring Data, Jmix 2’s data repositories combine the simplicity of repository interfaces with advanced Jmix data access features like data access control, entity events and cross-datastore references.
– **Entity Comments**: lets you add comments to data model entities and attributes, improving documentation and collaboration.
Jmix 2 brings notable enhancements to existing features, streamlining development and improving usability:
– **Studio UI Preview**: unlike Jmix 1’s schematic previews, Jmix 2’s Studio shows views with real components and styles, closely mirroring the running application.
– **Hot Deployment Status**: a new icon in Studio indicates the hot deployment status of view controllers, descriptors, message bundles, and roles, keeping developers informed about the delivery of the latest changes in the source code to the working application.
– **UUIDv7 for Entity Identifiers**: Jmix 2 uses UUIDv7 for entity identifiers, significantly boosting database operation performance compared to Jmix 1.
## Closing the Gap: Grouping DataGrid Coming Soon
The only notable feature missing in Jmix 2 compared to Jmix 1 is the GroupTable. However, this will be addressed with the upcoming Grouping DataGrid, set for release in October 2025. Once implemented, Jmix 2 will surpass Jmix 1 in every aspect, making it the definitive choice for modern application development.
## Jmix AI Assistant and Growing Ecosystem
**Jmix AI assistant** is optimized for Jmix 2 development, offering superior guidance compared to Jmix 1. Additionally, Jmix 2 benefits from a rapidly expanding ecosystem of documentation, guides, learning courses, and code examples. Unlike Jmix 1, which is in maintenance mode with only critical updates, Jmix 2’s resources are continuously improved, providing developers with more comprehensive support. This growing knowledge base also enhances compatibility with third-party AI assistants, making Jmix 2 projects easier to develop and maintain.
## Future-Proof Your Development with Jmix 2
Jmix 2 is a dynamic, evolving platform that receives new features and improvements every four months, ensuring your applications stay current with the latest technologies. In contrast, Jmix 1 is in maintenance mode, receiving only critical fixes. By migrating to Jmix 2, you gain access to a modern, secure, and feature-rich framework that enhances developer productivity and delivers superior user experiences.
Source: Upgrade to Jmix 2: Future-Proof Your Projects
This article explores why upgrading to Jmix 2 is a strategic move for your development projects.Se stai ancora utilizzando Jmix 1, ora è il momento perfetto per migrare a Jmix 2. Costruito su uno stack tecnologico moderno, supportato attivamente e ricco di nuove funzionalità potenti, Jmix 2 offre vantaggi significativi rispetto al suo predecessore. Questo articolo esplora perché l’aggiornamento a Jmix 2 è una mossa strategica per i tuoi progetti di sviluppo, migliorando produttività, sicurezza ed esperienza utente, garantendo al contempo la futura compatibilità delle tue applicazioni.
(Note: I have only provided the Italian translation as requested.)
This article explores why upgrading to Jmix 2 is a strategic move for your development projects.If you’re still using Jmix 1, now is the perfect time to migrate to Jmix 2. Built on a modern, actively supported technology stack and packed with powerful new features, Jmix 2 offers significant advantages over its predecessor. This article explores why upgrading to Jmix 2 is a strategic move for your development projects, enhancing productivity, security, and user experience while future-proofing your applications.
## Modern Technology Stack for Enhanced Security and Performance
Jmix 2 is built on a cutting-edge technology stack, including Spring Boot 3 and Vaadin 24, which are updated with each Jmix feature release every four months. In contrast, Jmix 1 is tied to Spring Boot 2 and Vaadin 8, both of which are no longer officially supported. This means Jmix 1 is limited to critical bug fixes and select security patches, with some third-party dependency vulnerabilities unfixable due to incompatibility with newer versions.
With Jmix 2, regular dependency updates ensure your applications benefit from the latest security patches, reducing vulnerabilities and enhancing safety. Additionally, newer Java versions in Jmix 2 deliver improved performance and modern language features, enabling developers to write cleaner, more efficient code. This forward-looking approach ensures your applications remain secure, performant, and aligned with industry standards.
## Mobile-Friendly and Customizable UI with Vaadin 24
Jmix 2 leverages Vaadin 24 to deliver a mobile-friendly user interface out of the box. Unlike Jmix 1, which requires separate mobile applications or complex workarounds, Jmix 2 supports responsive layouts, allowing you to optimize your UI for mobile devices without additional development effort. This streamlines development and ensures a consistent user experience across desktops, tablets, and smartphones.
Moreover, Vaadin 24 provides greater control over your application’s look and feel. With direct access to DOM elements and straightforward CSS styling, customizing the UI is simpler than ever. Jmix 2 also includes Java wrappers for standard HTML elements like `div`, `span`, `p` and `hr`, making it easier to create tailored, visually appealing interfaces that align with your brand. Additionally, the frontend part of Jmix 2 is now based on the web components standard, significantly simplifying the integration of third-party JavaScript components and libraries, enabling developers to enhance their applications with a wider range of modern tools and functionalities.
## Enhanced Navigation and User Experience
Jmix 2 introduces standard browser navigation for opening views, aligning with familiar web browsing behaviors. Users can now open views in new browser tabs via the context menu and use deep links to access specific application views directly. For those who prefer the Jmix 1 approach of opening screens in internal tabs within a single browser tab, Jmix 2 offers the optional **Tabbed Application Mode** add-on, providing flexibility to suit different preferences.
## New Features and Improvements in Jmix 2
Jmix 2 introduces a range of powerful add-ons and functionalities that are absent in Jmix 1, empowering developers to build more sophisticated applications with less effort:
– **Kanban Add-on**: visualizes project workflows with a Kanban board component, using cards for tasks and columns for project stages.
– **Superset Add-on**: allows you to embed Apache Superset dashboards into your Jmix application views, enhancing data visualization capabilities.
– **UI Constraints Add-on**: manages UI component visibility and accessibility using declarative policies in resource roles, even for components not tied to the data model.
– **OpenID Connect Add-on**: simplifies external authentication with providers like Keycloak, mapping user attributes and roles to Jmix users seamlessly.
– **REST DataStore Add-on**: allows you to easily integrate external Jmix applications, accessing remote entities through the `DataManager` interface as if they were local, with full CRUD functionality.
– **Authorization Server Add-on**: provides authentication for REST APIs in compliance with OAuth 2.1, ensuring secure and standardized API access.
– **OpenAPI Integration in Studio**: configures OpenAPI client generators and automatically generates DTO entities, mappers, and services for integration with external REST APIs.
– **Data Repositories**: built on Spring Data, Jmix 2’s data repositories combine the simplicity of repository interfaces with advanced Jmix data access features like data access control, entity events and cross-datastore references.
– **Entity Comments**: lets you add comments to data model entities and attributes, improving documentation and collaboration.
Jmix 2 brings notable enhancements to existing features, streamlining development and improving usability:
– **Studio UI Preview**: unlike Jmix 1’s schematic previews, Jmix 2’s Studio shows views with real components and styles, closely mirroring the running application.
– **Hot Deployment Status**: a new icon in Studio indicates the hot deployment status of view controllers, descriptors, message bundles, and roles, keeping developers informed about the delivery of the latest changes in the source code to the working application.
– **UUIDv7 for Entity Identifiers**: Jmix 2 uses UUIDv7 for entity identifiers, significantly boosting database operation performance compared to Jmix 1.
## Closing the Gap: Grouping DataGrid Coming Soon
The only notable feature missing in Jmix 2 compared to Jmix 1 is the GroupTable. However, this will be addressed with the upcoming Grouping DataGrid, set for release in October 2025. Once implemented, Jmix 2 will surpass Jmix 1 in every aspect, making it the definitive choice for modern application development.
## Jmix AI Assistant and Growing Ecosystem
**Jmix AI assistant** is optimized for Jmix 2 development, offering superior guidance compared to Jmix 1. Additionally, Jmix 2 benefits from a rapidly expanding ecosystem of documentation, guides, learning courses, and code examples. Unlike Jmix 1, which is in maintenance mode with only critical updates, Jmix 2’s resources are continuously improved, providing developers with more comprehensive support. This growing knowledge base also enhances compatibility with third-party AI assistants, making Jmix 2 projects easier to develop and maintain.
## Future-Proof Your Development with Jmix 2
Jmix 2 is a dynamic, evolving platform that receives new features and improvements every four months, ensuring your applications stay current with the latest technologies. In contrast, Jmix 1 is in maintenance mode, receiving only critical fixes. By migrating to Jmix 2, you gain access to a modern, secure, and feature-rich framework that enhances developer productivity and delivers superior user experiences.
Source: Upgrade to Jmix 2: Future-Proof Your Projects
This article shares the story of Ondrej, a senior Java developer, who accelerated full-stack development using Jmix.In the world of software development, finding tools that simplify the process without sacrificing functionality is a game-changer. Ondrej, a seasoned Java developer with over 20 years of experience, shares his journey of discovering Jmix and how it transformed his approach to building full-stack applications. His story highlights the challenges of traditional development and the advantages of adopting Jmix for solo developers and teams alike.
The Challenges of Traditional Full-Stack Development
Ondrej’s career has been deeply rooted in Java, with extensive experience in both back-end and front-end technologies like React and Angular. However, he often faced significant hurdles when working on full-stack projects, especially as a solo developer or in small teams.
– **Complexity**: Managing separate front-end and back-end stacks required extensive effort, from business analysis to deployment.
– **Resource Constraints**: As a freelancer for the Czech Academy of Sciences, Ondrej often worked alone on administrative applications, where hiring additional help was impractical due to bureaucratic limitations.
– **Time-Consuming Processes**: Older frameworks like GWT, which initially simplified his workflow, became obsolete and introduced slow build times (up to 5 hours for transpilation).
These challenges led Ondrej to seek a more efficient solution — one that would allow him to focus on business logic rather than juggling multiple technologies.
Discovering Jmix: A Turning Point
Ondrej was actively looking for a framework that would let him build full-stack applications using only Java. When he discovered Jmix, its modern approach and developer-centric features immediately caught his attention — it looked like the tool he’d been searching for.
Key Benefits He Experienced:
1. **Unified Development**: Jmix’s back-end-driven approach eliminated the need to worry about front-end security and state management, as the client side is inherently trusted.
2. **Rapid Prototyping**: Using Jmix’s Figma component library, Ondrej could quickly create mock-ups and iterate with stakeholders before diving into development.
3. **Speed of Development**: Building CRUD views and configurable applications became significantly faster, allowing him to deliver projects in weeks rather than months.
Ondrej has implemented several critical projects with Jmix, including:
1. Czech Academy of Sciences – Economic Department
a. A grant management system for 50+ institutions, handling requests, approvals, and PDF generation.
b. Supports 300 – 400 users with no performance issues, leveraging add-ons like Reporting and OpenID.
2. Scientific Evaluation System
a. A large-scale application for evaluating thousands of scientific articles by international experts.
b. Designed for 3,000 – 5,000 users, currently stress-tested with 1,000 active users ahead of its April launch.
For smaller projects, Ondrej notes that a 15 – 20 screen application can be built in just two weeks — a testament to Jmix’s efficiency.
Based on his experience, Ondrej recommends Jmix for:
– Freelancers and solo developers looking for an efficient and powerful development framework.
– Large organizations needing rapid prototyping to validate business concepts quickly.
– Internal business applications across industries, including banking, research, and corporate sectors.
Jmix’s flexibility and ease of development make it a strong choice for a wide range of projects with a predictable number of users.
Ondrej plans to continue using Jmix for upcoming projects, particularly for internal company systems. His goal is to avoid the “front-end fatigue” of frameworks like React and Angular, focusing instead on solving business problems efficiently.
His Advice to Other Developers:
“If you want to concentrate on business logic and avoid hunting pixels or debugging race conditions, Jmix is the way to go. It’s a powerful tool for freelancers, prototyping, and large enterprises looking for manageable solutions.”
What if you need to embed features from a Jmix, Vaadin, or Spring application into another website or web application?What if you need to embed features from a Jmix, Vaadin, or Spring application into another website or web application? If your target platform isn’t a portal system, the common approach is to use IFrame technology for this purpose.
However, setting up IFrames today may not be entirely straightforward.
When deploying outside your local PC, the application opened in an IFrame will likely require browser cookie support to function properly. Modern security standards dictate that cross-site cookie exchange only works when the following requirements are met:
– Both the target site and the embedded application use a trusted HTTPS setup.
– Session cookies have the Secure property enabled.
– The SameSite property is disabled for these cookies.
This means extra server configuration is required, even for testing or staging environments.
As an example, we’ll use a server with the IP address 10.5.44.78, hosting both a Docker-based Jmix application and a static website that will be served with nginx frontend server configured for HTTPS. This could be run by a virtual server or a local virtual machine running a Linux-based OS.
For production, you can purchase SSL certificates or use free options like Let’s Encrypt/ACME software. For testing purposes, we’ll set up fake domain names and map them to the server’s IP in the /etc/hosts file (located in Windows\System32\drivers\etc on a Windows PC). Add the following line to this file:
“`10.5.44.78 app.jmix site.jmix “`
After that, when you open “`https://app.jmix in browser“`, it will send requests to IP-address we specified above.
For easier access, you can also install a public SSH key (which you may need to generate first) on the remote server using the following command:
For this simple website, we won’t use any libraries or frameworks. Instead, we’ll write code that opens a browser-native dialog window when a link is clicked, embedding the IFrame contents.
YouTube is a video content visualisation service provided by Google Ireland Limited. This service allows this Website to incorporate content of this kind on its pages. This widget is set up in a way that ensures that YouTube will not store information and cookies about Users on this Website unless they play the video.

 On this webinar, we showed you how to use Jmix BPM to build event-driven processes.Event-Driven Approach to Development of Process Applications
 We would like to demonstrate how to solve typical problems while creating an admin interface in Jmix and to show the benefits and the limitations of this approach.We often hear at conferences and other events how different development teams struggle with the problem of having to develop an admin interface quickly and efficiently. Some of them go for expensive custom solutions they develop all by themselves; others try looking for ready-made alternatives on the market that would fit all their business requirements. Certain hybrids of the two approaches are not unheard of. The problems they thus solve might look familiar to our team members, since we have had to deal with them too. We are lucky though to have a tool that offers a natural solution to the problem, a tool we have built ourselves. So, in this article, we would like to demonstrate how to solve typical problems while creating an admin interface in Jmix and to show the benefits and the limitations of this approach.
  The Kubernetes clustering software is becoming server applications management standard as, probably, the most feature rich and widely supported infrastructure toolchain.The Kubernetes clustering software is becoming server applications management standard as, probably, the most feature rich and widely supported infrastructure toolchain. However, it is still hard to set up from scratch. This can be fine when you run on cloud hosting with unlimited capacity but causes problems when you have to use your own software, or a custom configuration is needed. The good news is that such problems don’t usually appear at the application level, so you should be able to easily change your cluster software vendor when required without rewriting your applications from scratch.
 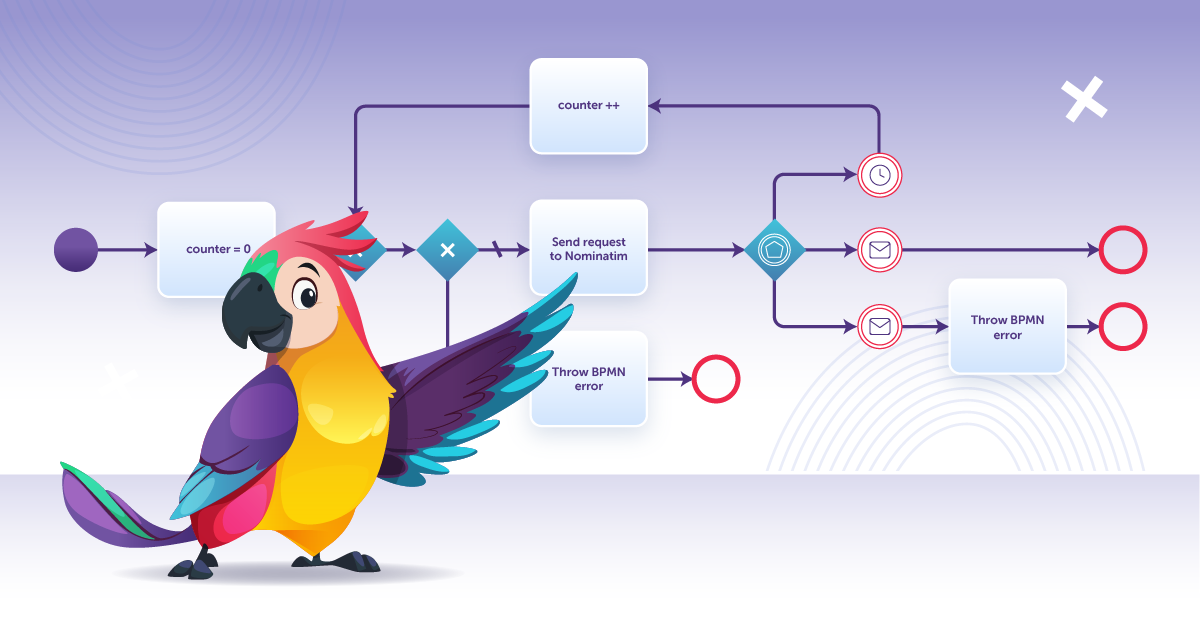 A helpful guide for those working with Camunda or Flowable who want to design processes the right way without surprises.Quite often one has to make API calls to various external services. In essence, it is a standard system orchestration scenario or even a microservice orchestration scenario (sorry for a buzzword). It looks simple and logical on a BPMN diagram – we knock at some door using an API, receive a response, and move on to the next task. For the analysis level models it is all quite normal.
  A pragmatic approach to build billion-dollar apps with a small team.A pragmatic approach to build billion-dollar apps with a small team


 This webinar covered the new features and enhancements in the latest version of Jmix and our roadmap for future updates.Release Jmix 2.6 is here, and we are glad to share more details about key updates to this new version with you!
 In this article, we are going to talk about how to build a successful delivery strategy using Jmix.## Introduction


 Everywhere you look, even the most serious enterprise solutions are expected to have at least some low-code elements.Low code gatecrashed the corporate landscape in the 2020s, growing faster than anyone expected. At first, we thought, “Well, it’s a cute little thing—let the users play at being programmers as long as they don’t get in the way.” Fast forward to today, and everywhere you look, even the most serious enterprise solutions are expected to have at least some low-code elements.
  Modern frameworks like React enable the efficient creation of visually appealing and functional interfaces. But is React the only option? What other tools can effectively support business application development.## Introduction
 In this webinar we dive into different delivery models supported by Jmix.The webinar explored how product teams can efficiently build and deliver scalable, maintainable digital products using the Jmix platform. It focused on solving common problems in B2B software delivery like managing endless client customizations, code forks, and growing maintenance costs.
  Overview of the new features and important changes of the Jmix 2.6 feature release.We are pleased to announce the release of Jmix 2.6, which includes new features, enhancements, and performance improvements. This release brings significant updates to Jmix Studio, introduces new UI components, and boosts productivity with smarter tools and integrations.


 In this article, we talk about process variables: what they’re for, how they differ from programming variables, and how scope works.This article continues the BPMN: Beyond the Basics series – a look at the practical, less-discussed aspects of working with BPMN for developers. Today, we’ll talk about process variables: what they’re for, how they differ from programming variables, and how scope works. At first glance, it might seem like there’s nothing special about them, but if you dig below the surface, there’s more nuance than expected. In fact, we couldn’t fit it all into one piece article, so we’re splitting this topic into two parts.
  Starting July 1st, 2025, we are introducing an updated subscription model for Jmix. These changes reflect the feedback we’ve gathered from long-term users and our ongoing efforts to keep Jmix sustainable and aligned with real-world development needs.Starting **July 1st, 2025**, we are introducing an updated subscription model for Jmix. These changes reflect the feedback we’ve gathered from long-term users and our ongoing efforts to keep Jmix sustainable and aligned with real-world development needs.
  This article explores why upgrading to Jmix 2 is a strategic move for your development projects.If you’re still using Jmix 1, now is the perfect time to migrate to Jmix 2. Built on a modern, actively supported technology stack and packed with powerful new features, Jmix 2 offers significant advantages over its predecessor. This article explores why upgrading to Jmix 2 is a strategic move for your development projects, enhancing productivity, security, and user experience while future-proofing your applications.
 This article shares the story of Ondrej, a senior Java developer, who accelerated full-stack development using Jmix.In the world of software development, finding tools that simplify the process without sacrificing functionality is a game-changer. Ondrej, a seasoned Java developer with over 20 years of experience, shares his journey of discovering Jmix and how it transformed his approach to building full-stack applications. His story highlights the challenges of traditional development and the advantages of adopting Jmix for solo developers and teams alike.
  What if you need to embed features from a Jmix, Vaadin, or Spring application into another website or web application?What if you need to embed features from a Jmix, Vaadin, or Spring application into another website or web application? If your target platform isn’t a portal system, the common approach is to use IFrame technology for this purpose.